Authsignal secures millions of passkey transactions out of our hosted Sydney region.

Authsignal secures millions of passkey transactions out of our hosted Sydney region.

Join us today!
Blog
/
Current article

Action & rules: The complete implementation guide

Last Updated:
May 27, 2025
Ashutosh Bhadauriya
Action & rules: The complete implementation guide
AWS Partner
Authsignal is an AWS-certified partner and has passed the Well-Architected Review Framework (WAFR) for its Cognito integration.
AWS Marketplace

In Part 1, we explored how Authsignal actions serve as the foundation for contextual authentication by tracking user activities and providing rich context for security decisions. In Part 2, we dove deep into the rules engine, learning how to create sophisticated no-code rules that evaluate risk factors and determine when to challenge users.

Now, it's time to bring it all together with practical implementation guidance. In this article, we'll show you exactly how to integrate actions and rules into your applications with real code examples, best practices, and advanced patterns.

Let's get started by setting up your development environment for Authsignal integration.

Getting started

Install the required SDKs

 # Server-side SDK (Node.js)
npm install @authsignal/node

# Client-side SDK (Web)
npm install @authsignal/browser

Server-side setup

Initialise the Authsignal client with your tenant credentials

// server.js
const { Authsignal } = require('@authsignal/node');

const authsignal = new Authsignal({
  secret: process.env.AUTHSIGNAL_SECRET_KEY,
  baseUrl: process.env.AUTHSIGNAL_API_BASE_URL // Region-specific URL
});

Client-side setup

For web applications, initialize the client SDK:

// client.js
import { Authsignal } from '@authsignal/browser';

const authsignal = new Authsignal({
  tenantId: 'AUTHSIGNAL_TENANT_ID',
  baseUrl: 'AUTHSIGNAL_API_BASE_URL' // Region-specific URL
});

Implementing your first action

Let's start with a practical example: implementing secure sign-in with Authsignal actions and rules. This example demonstrates the core pattern you'll use throughout your application.

Step 1: Server-side action tracking

When a user attempts to sign in, track the action with Authsignal to determine if additional security measures are needed:

// POST /api/auth/signin
app.post('/api/auth/signin', async (req, res) => {
  try {
    // First, validate credentials with your existing auth system
    const user = await validateCredentials(req.body.email, req.body.password);
    
    if (!user) {
      return res.status(401).json({ error: 'Invalid credentials' });
    }
    
    // Track the sign-in action with Authsignal
    const result = await authsignal.track({
      userId: user.id,
      action: 'signIn',
      attributes: {
        // Essential context for rule evaluation
        deviceId: req.body.deviceId,
        ipAddress: req.ip,
        userAgent: req.headers['user-agent']
      }
    });
    
    // Handle the result based on your configured rules
    return handleAuthResult(result, user, res);
    
  } catch (error) {
    console.error('Authentication error:', error);
    return res.status(500).json({ error: 'Authentication failed' });
  }
});

Step 2: Handling different rule outcomes

Create a helper function to handle the different outcomes your rules might produce:

function handleAuthResult(result, user, res) {
  switch (result.state) {
    case 'ALLOW':
      // User is trusted, proceed without challenge
      const session = createUserSession(user);
      return res.json({ 
        success: true, 
        session,
        message: 'Login successful' 
      });
      
    case 'CHALLENGE_REQUIRED':
      // Rules determined additional verification is needed
      return res.json({
        requiresChallenge: true,
        challengeUrl: result.url,        // For hosted UI
        challengeToken: result.token,    // For custom UI
        message: 'Additional verification required'
      });
      
    case 'REVIEW':
      // Action requires manual review
      return res.json({
        requiresReview: true,
        message: 'Your login is being reviewed for security purposes. This typically takes a few minutes.'
      });
      
    case 'BLOCK':
      // Rules determined this is high-risk, block the attempt
      logSecurityEvent('blocked_signin', {
        userId: user.id,
        reason: 'rule_triggered',
        ip: req.ip
      });
      return res.status(403).json({
        error: 'This login attempt has been blocked for security reasons.'
      });
        
    default:
      // Unexpected state, default to secure behavior
      return res.status(500).json({
        error: 'An unexpected error occurred. Please try again.'
      });
  }
}

Step 3: Client-side device identification

To enable device-based rules, you need to provide a consistent device identifier. Authsignal's web SDK automatically manages this:

// client-side: Get device ID for tracking
function getDeviceId() {
  // Authsignal automatically creates a device ID cookie
  const cookies = document.cookie.split(';');
  for (const cookie of cookies) {
    const [name, value] = cookie.trim().split('=');
    if (name === '__as_aid') {
      return value;
    }
  }
  
  // Fallback to SDK's anonymous ID if cookie doesn't exist yet
  return authsignal.anonymousId;
}

// Use in your login form
async function handleLogin(email, password) {
  const response = await fetch('/api/auth/signin', {
    method: 'POST',
    headers: { 'Content-Type': 'application/json' },
    body: JSON.stringify({
      email,
      password,
      deviceId: getDeviceId()
    })
  });
  
  const result = await response.json();
  
  if (result.requiresChallenge) {
    // Handle challenge flow
    await handleChallenge(result.challengeUrl, result.challengeToken);
  } else if (result.success) {
    // Redirect to dashboard or home page
    window.location.href = '/dashboard';
  }
}

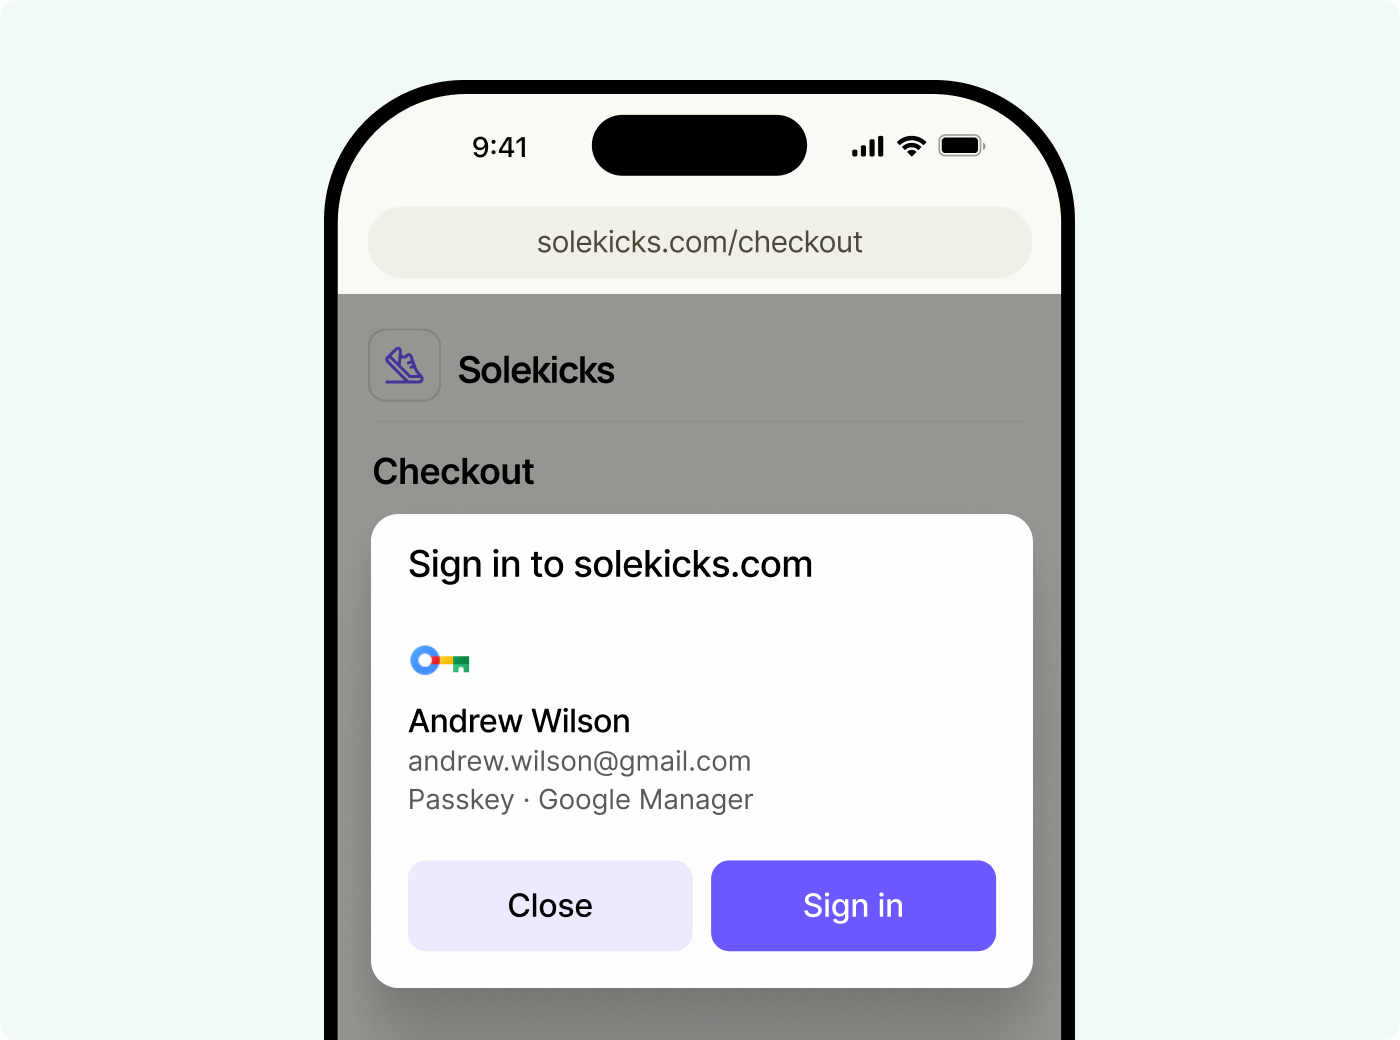
Handling authentication challenges

When your rules determine that a challenge is required, you have two main options for presenting it to users: hosted UI or custom UI with SDKs.

Option 1: Using hosted UI

// client-side: Handle challenge with hosted UI
async function handleChallenge(challengeUrl) {
  try {
    // Launch Authsignal's hosted UI
    const result = await authsignal.launch({
      url: challengeUrl,
      mode: 'popup',     // or 'redirect'
    });
    
    if (result.token) {
      // Send the token to your server for validation and session creation
      const response = await fetch('/api/auth/validate-challenge', {
        method: 'POST',
        headers: { 'Content-Type': 'application/json' },
        body: JSON.stringify({ token: result.token })
      });
      
      const validation = await response.json();
      if (validation.success) {
        window.location.href = '/dashboard';
      }
    }
  } catch (error) {
    console.error('Challenge failed:', error);
    showErrorMessage('Authentication failed. Please try again.');
  }
}

Option 2: Custom UI with client SDKs

// client-side: Custom UI challenge handling
async function handleCustomChallenge(token) {
  // Set the challenge token
  authsignal.setToken(token);
  
  // Check what authentication methods the user has available
  try {
    // Try passkey authentication first (most secure and convenient)
    if (await userHasPasskey()) {
      return await handlePasskeyChallenge();
    }
    
    // Fall back to other methods
    return await handleOtherAuthMethods();
    
  } catch (error) {
    console.error('Challenge error:', error);
    showErrorMessage('Authentication failed. Please try again.');
  }
}

async function handlePasskeyChallenge() {
  try {
    const result = await authsignal.passkey.signIn({
      action: 'signIn'
    });
    
    if (result.token) {
      // Send the token to your server for validation
      const response = await fetch('/api/auth/validate-challenge', {
        method: 'POST',
        headers: { 'Content-Type': 'application/json' },
        body: JSON.stringify({ token: result.token })
      });
      
      const validation = await response.json();
      return validation;
    }
  } catch (error) {
    // Handle passkey-specific errors
    if (error.name === 'ERROR_CEREMONY_ABORTED') {
      // User cancelled the passkey prompt
      showMessage('Authentication cancelled. Please try again.');
    } else {
      // Fall back to other authentication methods
      return await handleOtherAuthMethods();
    }
  }
}

Server-side challenge validation

Validate challenge results on your server:

// POST /api/auth/validate-challenge
app.post('/api/auth/validate-challenge', async (req, res) => {
  const { token } = req.body;
  
  try {
    const result = await authsignal.validateChallenge({ token });
    
    if (result.state === 'CHALLENGE_SUCCEEDED') {
      // Create authenticated session
      const user = await getUserById(result.userId);
      const session = createUserSession(user);
      
      return res.json({
        success: true,
        session,
        message: 'Authentication successful'
      });
    } else {
      return res.status(401).json({
        success: false,
        message: 'Authentication challenge failed'
      });
    }
  } catch (error) {
    console.error('Challenge validation error:', error);
    return res.status(500).json({
      success: false,
      message: 'An error occurred during authentication'
    });
  }
});

Working with custom data points

You can also create rules based on your own business data. This requires two steps: defining custom data points in the Authsignal portal and including that data when tracking actions.

Defining custom data points

Before using custom data in rules, you need to define the data points in the Authsignal Portal:

  1. Navigate to your action's Rules section
  2. Click "Add feature" when creating a rule
  3. Select the "Custom" tab
  4. Click "Create data point" and define your data point and fill in the details.

The Type field is crucial:

  • Number: Enables comparisons like >, <, >=, <=
  • String: Enables operations like CONTAINS, STARTS_WITH
  • Boolean: Enables == and != operations
  • Multiselect: For data points that can have multiple predefined values

Using custom data in actions

When you include custom data with your actions, it must be nested within a custom object in the attributes:

const result = await authsignal.track({
  userId: "user-123",
  action: "withdrawFunds",
  attributes: {
    // Standard Authsignal context
    deviceId: req.body.deviceId,
    ipAddress: req.ip,
    userAgent: req.headers['user-agent'],
    
    // Your custom business data
    custom: {
      withdrawalAmount: 2001,
      destinationType: "bank",
      isFirstWithdrawal: true,
      accountAgeInDays: 45
    }
  }
});

Note: The field names within the custom object must exactly match the names you defined when creating the custom data points in the Authsignal Portal.

Financial services example

Let's implement a basic example for a financial application:

// First, define these custom data points in the Authsignal Portal:
// - withdrawalAmount (Number)
// - destinationType (String) 
// - isNewDestination (Boolean)
// - velocityScore (Number)

app.post('/api/withdrawals', async (req, res) => {
  const { userId, amount, destinationAccount, destinationType } = req.body;
  
  try {
    // Calculate additional context
    const isNewDestination = await checkIfNewDestination(userId, destinationAccount);
    const velocityScore = await calculateWithdrawalVelocity(userId);
    
    // Track the withdrawal with custom data
    const result = await authsignal.track({
      userId,
      action: 'withdraw',
      attributes: {
        // Standard context
        deviceId: req.body.deviceId,
        ipAddress: req.ip,
        userAgent: req.headers['user-agent'],
        
        // Custom data points (must match Portal definitions exactly)
        custom: {
          withdrawalAmount: parseFloat(amount),
          destinationType: destinationType,
          isNewDestination: isNewDestination,
          velocityScore: velocityScore
        }
      }
    });
    
    return handleWithdrawalResult(result, userId, amount, destinationAccount, res);
    
  } catch (error) {
    console.error('Withdrawal error:', error);
    return res.status(500).json({ error: 'Withdrawal failed' });
  }
});

function handleWithdrawalResult(result, userId, amount, destination, res) {
  switch (result.state) {
    case 'ALLOW':
      // Process withdrawal immediately
      return processWithdrawal(userId, amount, destination, res);
      
    case 'CHALLENGE_REQUIRED':
      // Require additional verification
      return res.json({
        status: 'verification_required',
        challengeUrl: result.url,
        challengeToken: result.token,
        pendingTransactionId: createPendingTransaction(userId, amount, destination)
      });
      
    case 'REVIEW':
      // Queue for manual review
      const reviewTransaction = createReviewTransaction(userId, amount, destination);
      notifyReviewTeam(reviewTransaction);
      
      return res.json({
        status: 'under_review',
        transactionId: reviewTransaction.id,
        message: 'Your withdrawal is being reviewed and will be processed within 1-2 business days.'
      });
      
    case 'BLOCK':
      // Block the transaction
      logBlockedTransaction(userId, amount, destination, 'rule_triggered');
      return res.status(403).json({
        error: 'This withdrawal has been blocked for security reasons.'
      });
  }
}

Persistent user data

For data that needs to persist across multiple actions and inform future security decisions, use Authsignal's user custom data feature:

// Update user profile after successful actions
async function updateUserRiskProfile(userId, actionType, context) {
  try {
    const currentUser = await authsignal.getUser({ userId });
    
    // Calculate updated risk factors
    const updatedRiskScore = calculateRiskScore(currentUser, actionType, context);
    const loginCount = (currentUser.custom?.loginCount || 0) + 1;
    
    await authsignal.updateUser({
      userId,
      custom: {
        // Risk assessment
        riskScore: updatedRiskScore,
        lastRiskUpdate: new Date().toISOString(),
        
        // Activity tracking
        loginCount: loginCount,
        lastSuccessfulLogin: new Date().toISOString(),
        
        // Verification status
        kycStatus: currentUser.custom?.kycStatus || 'unverified',
        emailVerified: currentUser.custom?.emailVerified || false,
        
        // Business-specific data
        accountTier: await getUserTier(userId),
        totalSpent: await getUserTotalSpent(userId)
      }
    });
  } catch (error) {
    console.error('Failed to update user profile:', error);
  }
}

// Call after successful authentication
app.post('/api/auth/signin', async (req, res) => {
  // ... authentication logic ...
  
  if (result.state === 'ALLOW' || result.state === 'CHALLENGE_SUCCEEDED') {
    // Update user profile for future risk assessments
    await updateUserRiskProfile(user.id, 'login', {
      ip: req.ip,
      userAgent: req.headers['user-agent']
    });
  }
  
  // ... rest of response handling ...
});

Best practices recap

As you implement Authsignal in your application, keep these best practices in mind:

User experience

  • Use clear, contextual messaging for challenges
  • Implement progressive authentication (start with less friction)
  • Provide multiple authentication options when possible

Testing and monitoring

  • Test with different user risk profiles
  • Monitor authentication success rates
  • Regularly review and adjust rules based on data

Conclusion

Implementing Authsignal's actions and rules engine gives you the power to create sophisticated, risk-based authentication that adapts to your users and business needs. By following the patterns and examples in this guide, you can build a security system that protects against threats while maintaining a smooth user experience.

Regularly review your rules, monitor their effectiveness, and adjust based on new threats and user feedback. The flexibility of Authsignal's system allows you to evolve your security as your application and user base grow.

Ready to implement intelligent context-aware authentication in your app? Sign up for a free Authsignal account or book a demo with our team to get started.

Try out our passkey demo
Passkey Demo
Have a question?
Talk to an expert
You might also like
Action & Rules: Mastering Authsignal's Rules Engine
Learn how Authsignal's Rules Engine enables risk-based authentication with no-code rule creation, powerful conditions, and impact analysis. Discover how to build, test, and optimize rules for better security and user experience.
What Is A Passkey, And How Do Passkeys Work?
Explore why passkeys are replacing passwords for good. Learn how passkeys work, why they’re more secure, and how to implement them easily using Authsignal and FIDO2/WebAuthn standards.
Action & Rules: Understanding Authsignal Actions
Learn how to use Authsignal Actions to build smarter, risk-based authentication flows. Discover how actions capture user context and work with rules to enhance security without compromising UX.

Secure your customers’ accounts today with Authsignal.