Authsignal actions are the building blocks that let you create contextual, risk-based authentication flows that enhance security without sacrificing user experience.
At their core, actions represent specific user activities or events in your application that might require authentication verification. These can range from routine operations like sign-in to high-risk activities like withdrawing funds, changing account settings, or making large purchases.
What makes actions powerful is their flexibility - they allow you to:
- Track user behavior and context
- Apply different security requirements based on risk level
- Control which authentication methods are acceptable
Working hand-in-hand with actions are Authsignal's rules. While actions define what users are doing, rules determine when and how to challenge them based on risk factors. Rules evaluate the context of each action, analyzing everything from device characteristics and location to transaction details and user history to make intelligent security decisions.
Together, actions and rules form the foundation of Authsignal's approach to contextual security. In this first article of our series, we'll focus on actions, with a deep dive into rules coming in the next part.
Let's dive deeper into how actions work and how you can use them to build more secure user journeys.
Core components of an action
When you track an action in Authsignal, you're capturing all the contextual information needed to make smart security decisions. Here's what an action contains:
Required parameters
await authsignal.track({
  userId: "user-123", // Unique identifier for the user
  action: "withdraw", // The action code (what the user is doing)
  attributes: { // Contextual information
	  // Additional parameters go here
  }
});- userId: A unique identifier for the user performing the action
- action: A string that identifies what the user is doing (e.g., “signin", withdraw", "change-password")
- attributes: An object containing additional contextual information
Optional parameters
Within the attributes object, you can include:
attributes: {
  redirectUrl: "https://yourapp.com/callback",  // For hosted UI flows
  deviceId: "device-abc",                       // Unique device identifier
  ipAddress: "203.0.113.1",                     // User's IP address
}
These parameters provide rich context that can be used by Authsignal's Rules Engine to determine risk and the appropriate security response.
Rules engine
While we'll deep dive into rules in our next blog post, it's important to understand how actions and rules work together.
The rules engine allows you to create dynamic conditions that determine when to challenge users based on risk factors:
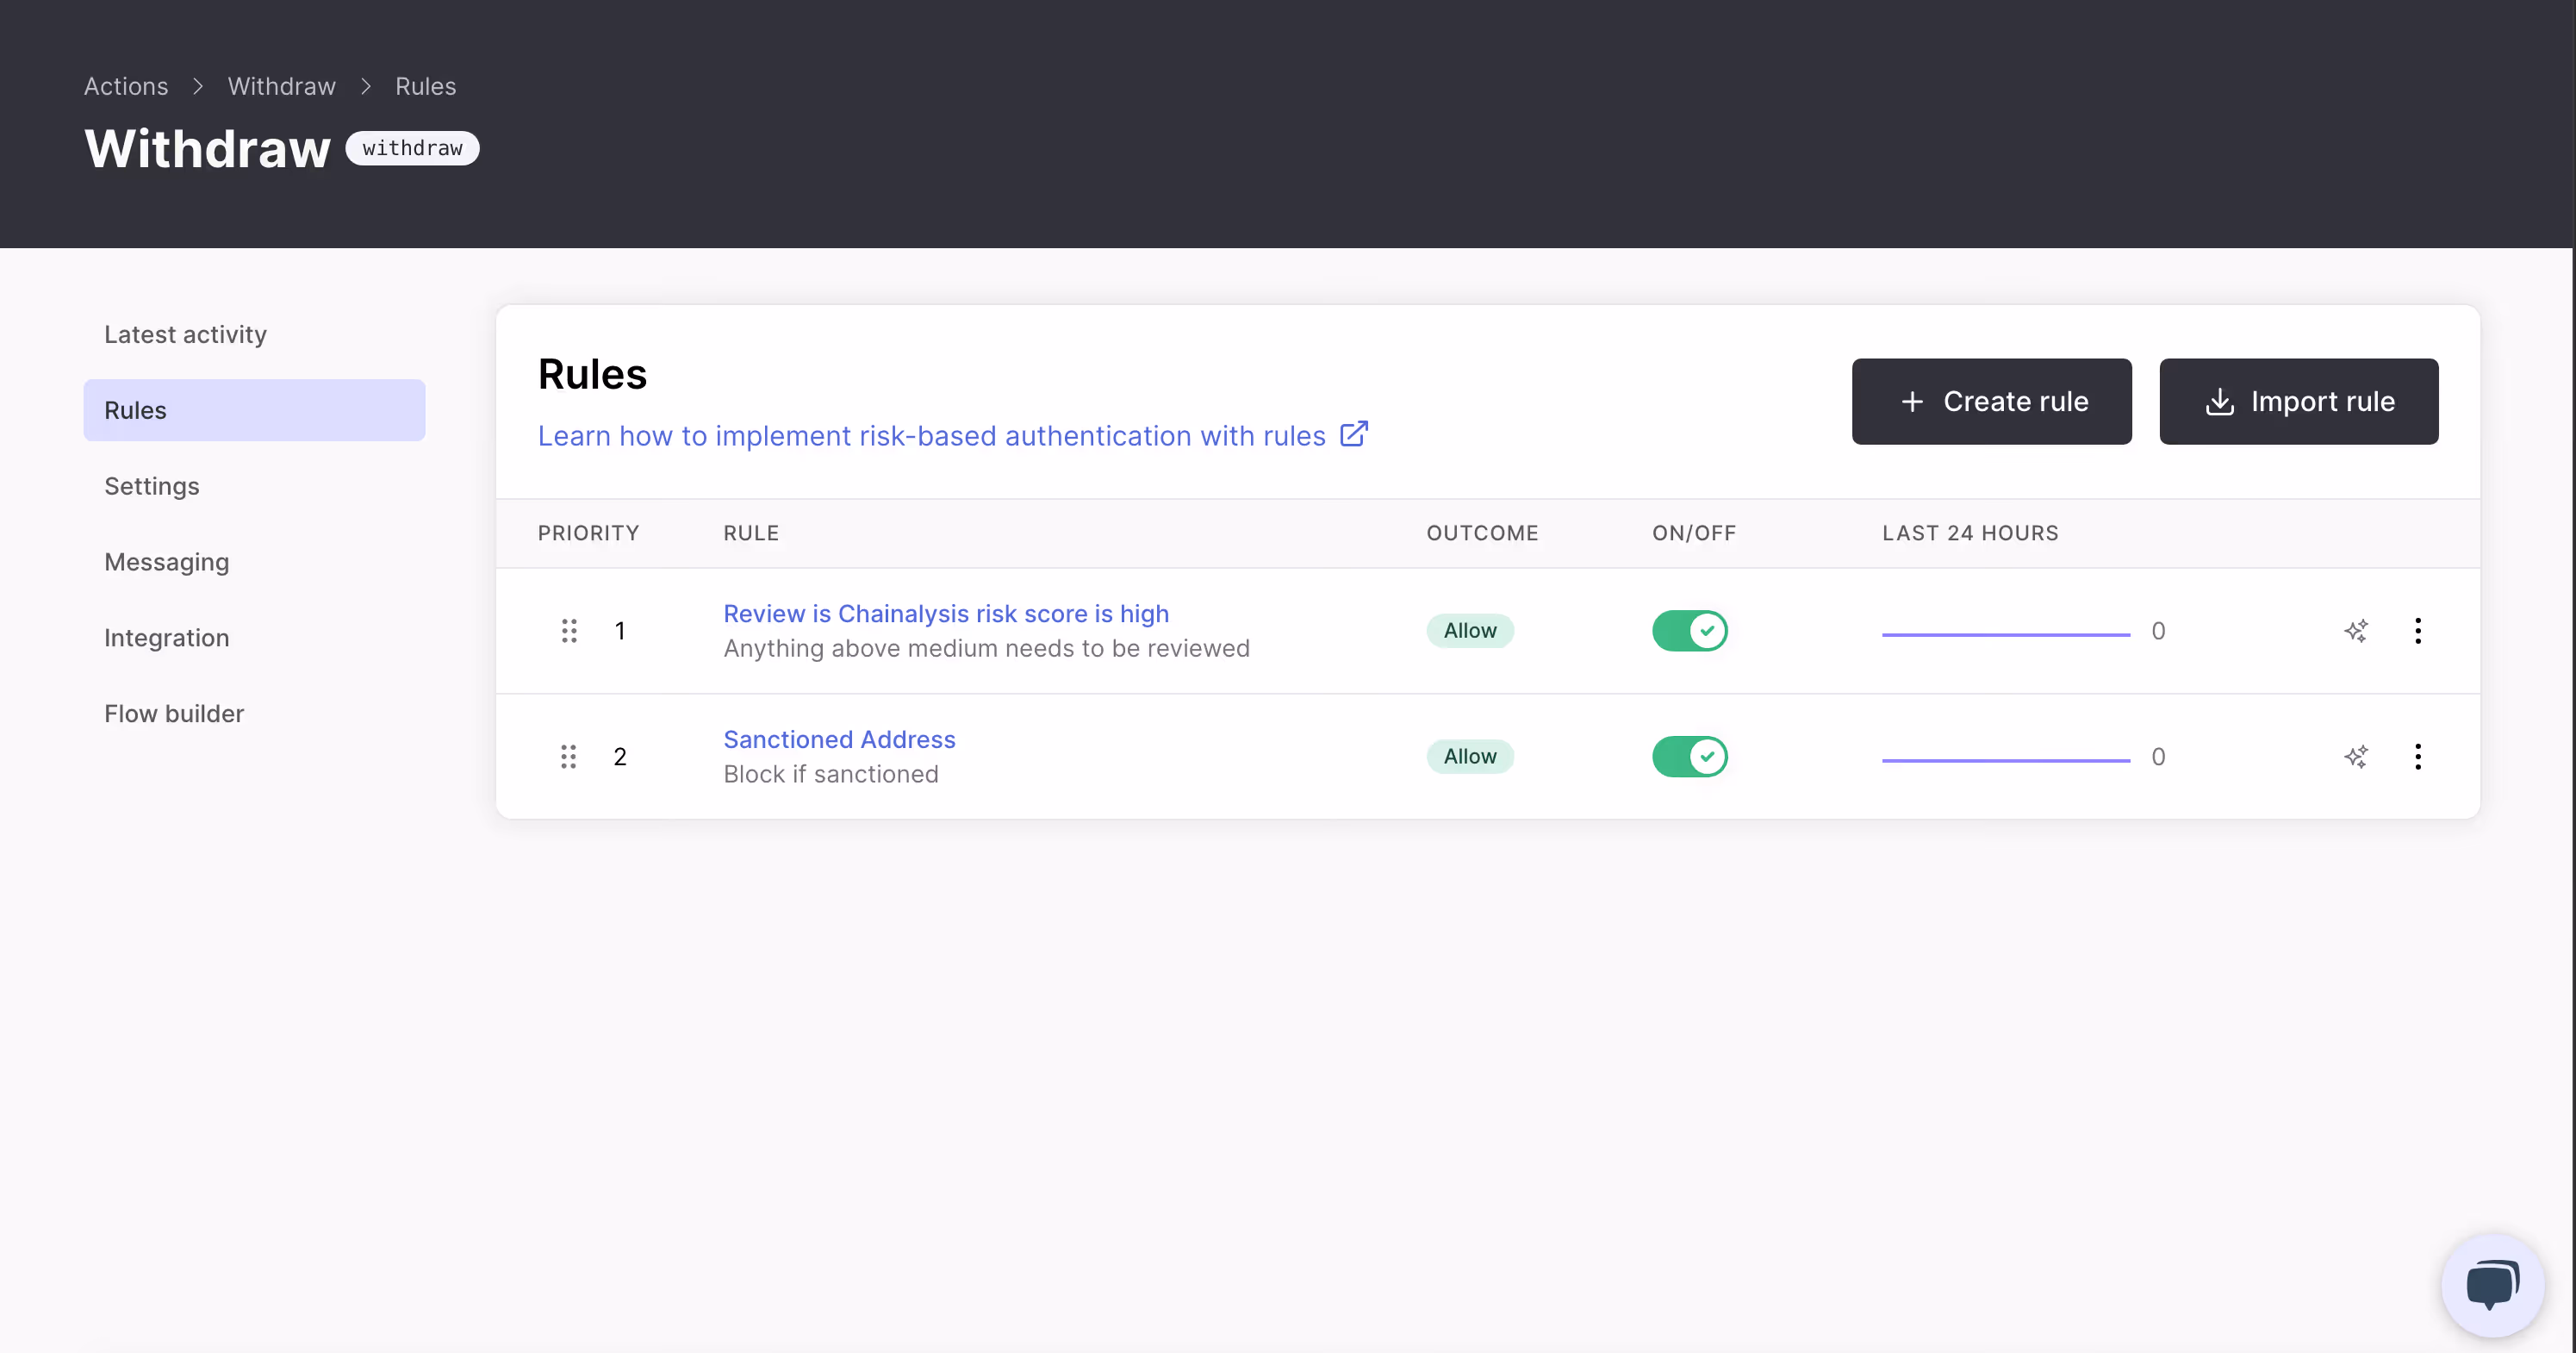
For example, you might create rules like:
- If the withdrawal amount exceeds $10,000, always require a challenge
- If the user is accessing from a new device, require a challenge
- If the destination address is on a sanctions list, block the transaction
- If a user transfers over $100,000 to a bank account that was added within the last 24 hours, require both MFA challenge AND place the action into manual review
Each rule can override the default outcome of the action, allowing for truly contextual security.
Action settings
Every action in Authsignal has configurable settings that determine its behavior. The most fundamental setting is the default outcome:

Default outcomes
- ALLOW: Let the user proceed without any additional authentication
- CHALLENGE: Require the user to complete an authentication challenge
- BLOCK: Prevent the action from proceeding
- REVIEW: Place the action into a manual review queue requiring human approval
The default outcome comes into play when no specific rules are triggered. This gives you a baseline security for each action type.
For example:
- A "view-account" action might default to ALLOW
- A "withdraw-funds" action might default to CHALLENGE
- A "transfer-large-sum" action might default to REVIEW when certain thresholds are met
- A "delete-account" action might default to BLOCK
Authenticator settings
For each action, you can configure which authentication methods are allowed when a challenge is required:
This gives you fine-grained control over security levels. For instance:
- For routine operations, you might allow any authenticator, including email magic links
- For financial transactions, you might restrict to more secure methods like TOTP or passkeys
- For critical security changes, you might require only the highest security methods
Override user's default authenticator
Authsignal also gives you the ability to override the user's preferred authenticator for specific actions. When enabled, this setting ignores the user's normal preferences and presents the authenticator you've chosen as the default option in the pre-built UI.
This feature is particularly useful for high-risk actions where you want to ensure users are using the strongest authentication method available, regardless of their usual preferences.
Passkey settings
Passkeys represent the latest in phishing-resistant authentication technology. For actions that support passkeys, you can configure additional settings:
- Prompt users to add a passkey: When enabled, users will be prompted to create a passkey after successfully completing a challenge. This helps increase passkey adoption across your user base by using existing authentication moments as enrollment opportunities.
These passkey prompts are a great way to gradually transition your user base to more secure authentication methods without disrupting their experience.
Contextual messaging
When a user is challenged, you can customize the message they see to provide context about why they're being asked to authenticate:
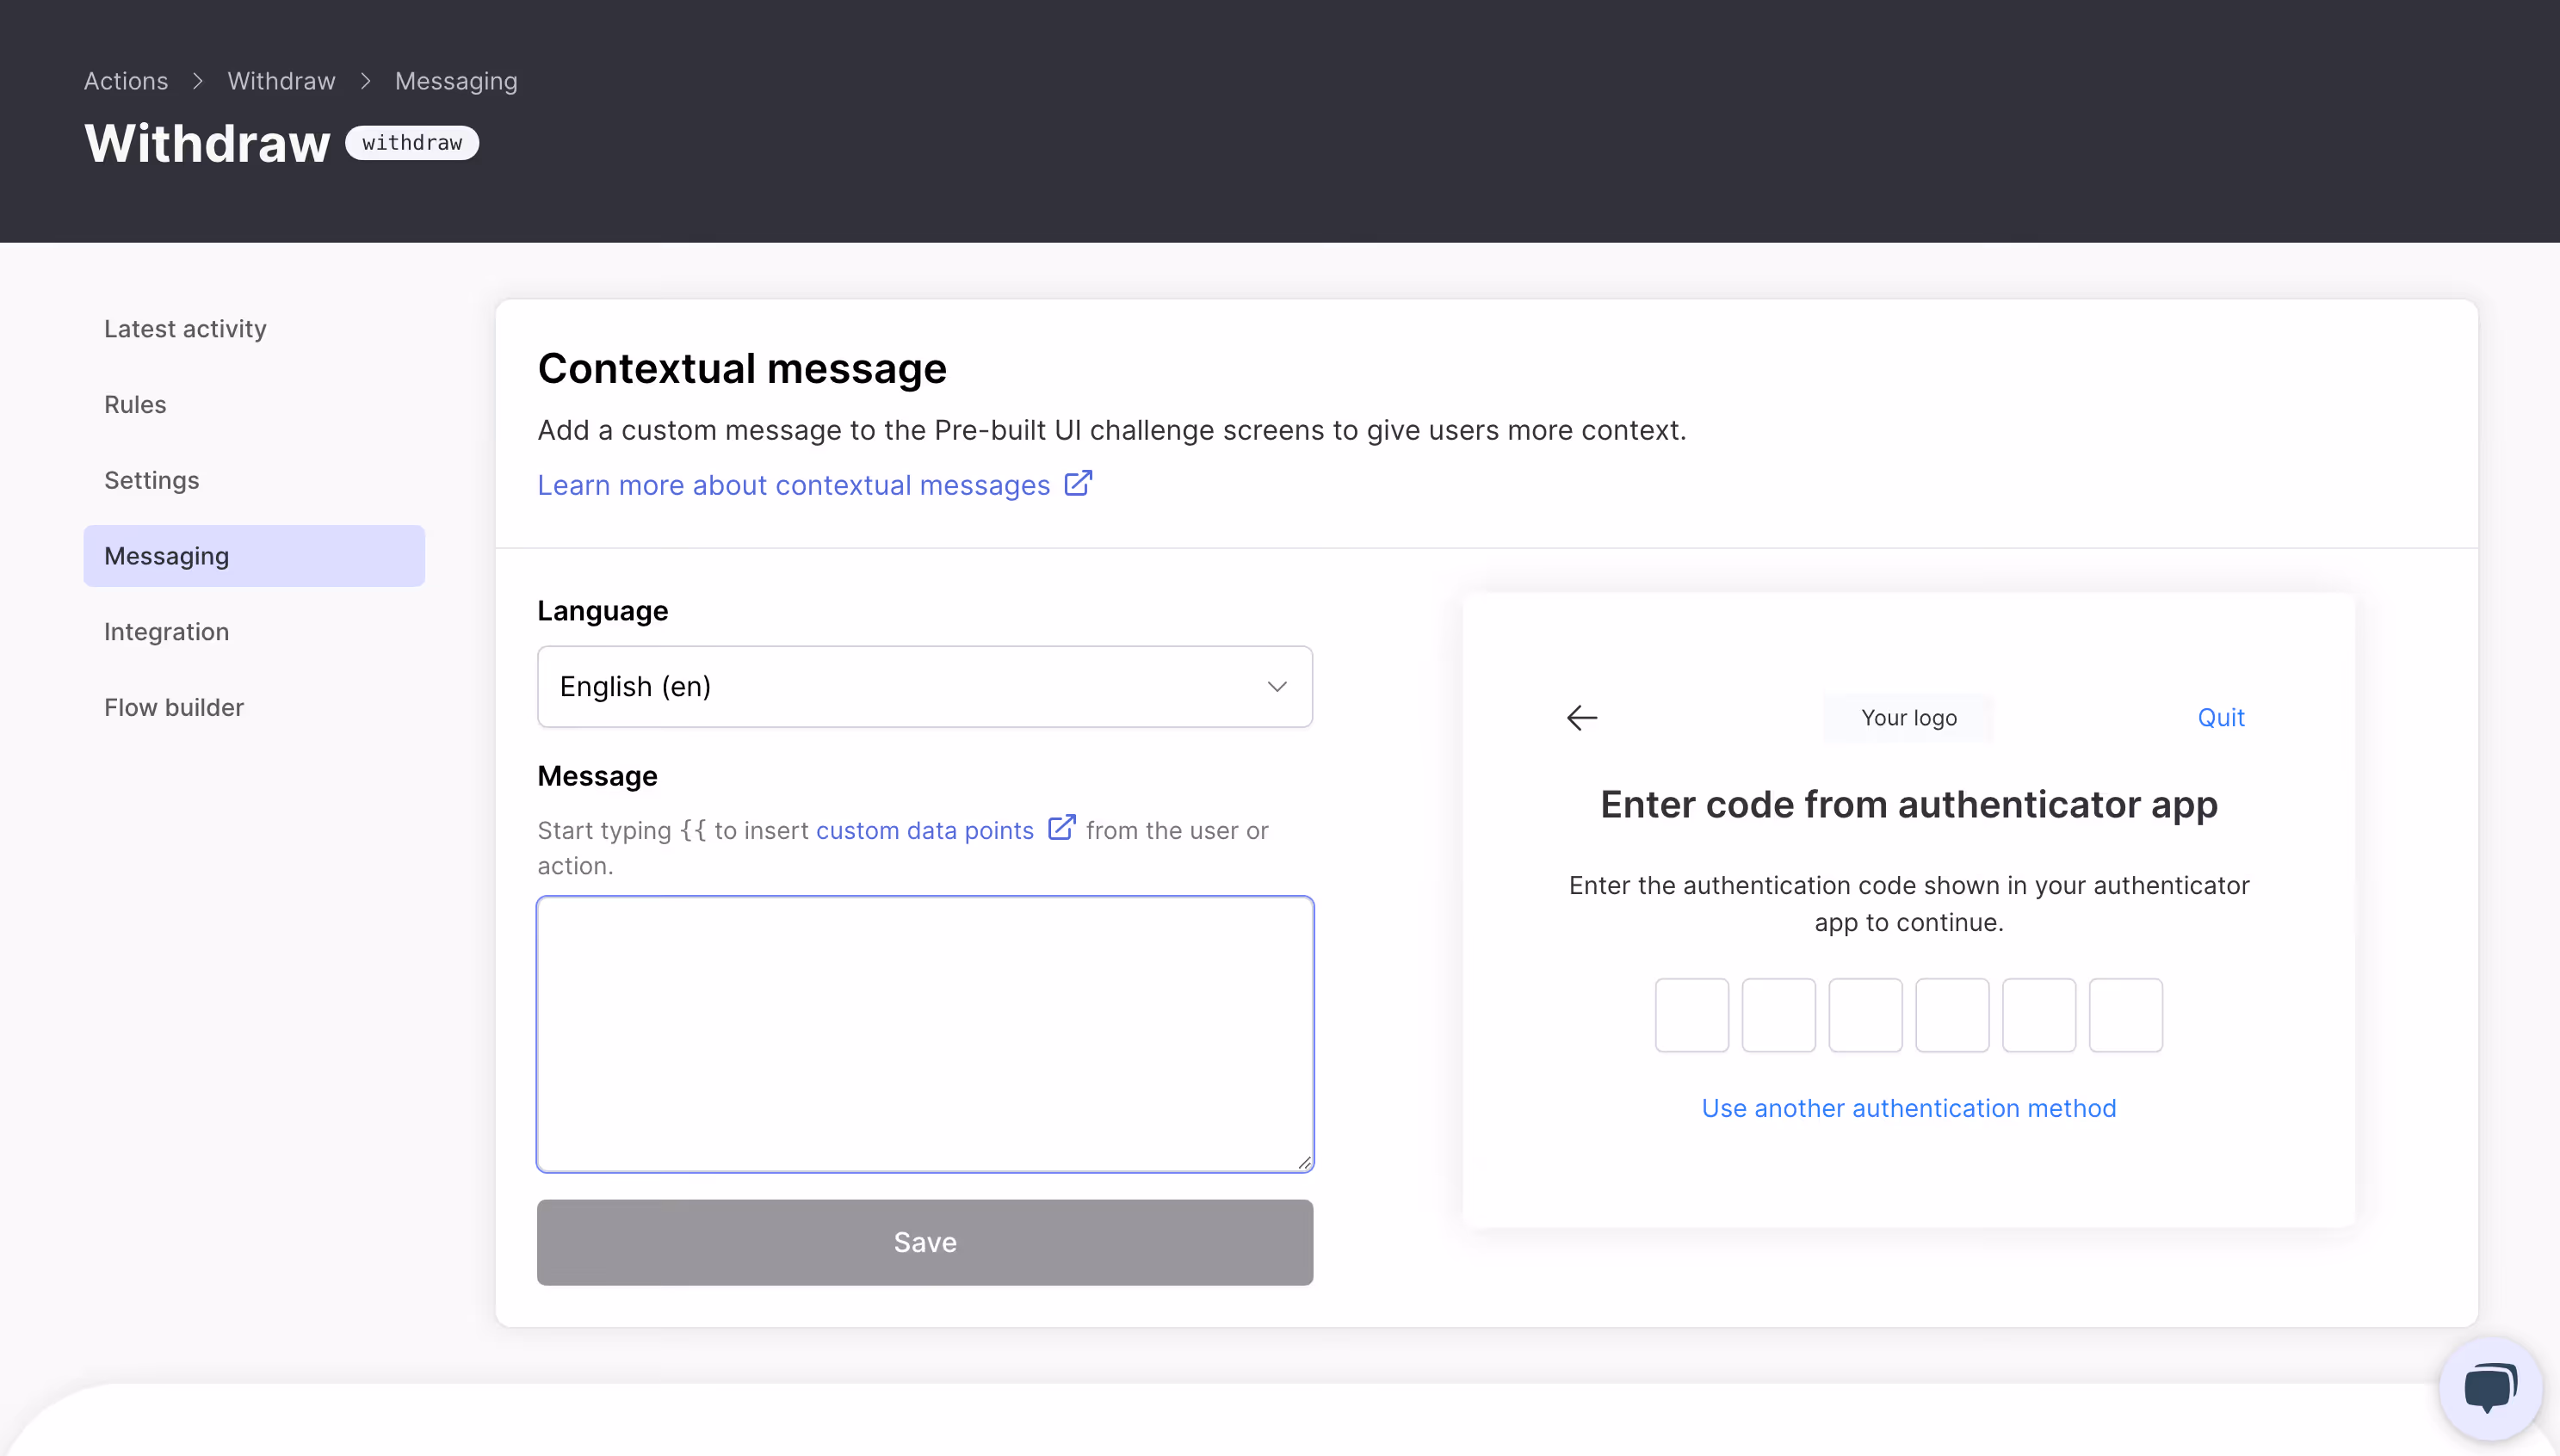
Please confirm your withdrawal of {{amount}} to account {{destinationAccount}}.This transparency improves the user experience by helping users understand why additional security steps are necessary.
Integrating actions in your app
Implementing actions in your application is pretty straightforward. Here's a basic integration flow:
1. Server-side integration
// Track an action on your server

const result = await authsignal.track({
  userId: "user-id",
  action: "withdraw",
  attributes: {
    redirectUrl: "https://yourapp.com/callback",
    deviceId: "deviceId",
    ipAddress: "ipAddress",
  }
});

// Check the result
if (result.state === "CHALLENGE_REQUIRED") {
  // User needs to complete a challenge
  return {
    url: result.url,      // For hosted UI
    token: result.token   // For SDK integration
  };
} else if (result.state === "ALLOW") {
  // Proceed with the action
  return { success: true };
} else if (result.state === "BLOCK") {
  // Action is blocked
  return { error: "This action cannot be completed" };
}
2. Client-side integration
For hosted UI:
// Redirect to or launch the hosted challenge UI

authsignal.launch({
  url: challengeUrl,
  mode: "popup" // or "redirect"
});
Or for custom UI (using client SDKs):
// Set the token from the track result
authsignal.setToken(token);

// Show the appropriate challenge based on the user's enrolled methods
const result = await authsignal.passkey.signIn({
  action: "withdraw"
});

// Send the result token back to your server for validation
if (result.token) {
  await validateChallenge(result.token);
}
3. Validation
Finally, validate the challenge on your server:
const result = await authsignal.validateChallenge({
  token: challengeToken
});

if (result.state === "CHALLENGE_SUCCEEDED") {
  // The user completed the challenge successfully
  // Proceed with the action
}
Best practices for actions
To get the most out of Authsignal Actions, consider these best practices:
- Name actions clearly: Use descriptive, consistent naming like "withdraw-funds" or "change-password"
- Default to security: For high-risk actions, set the default outcome to CHALLENGE.
- Start simple: Begin with a few key actions and rules, then expand as you learn
- Test thoroughly: Use the analytics dashboard to monitor how your actions and rules perform in the real world
Conclusion
Actions are the foundation of Authsignal's approach to contextual, risk-based authentication. By tracking the right actions with rich context, you can build authentication flows that are both secure and user-friendly.
In our next post, we'll dive deeper into Authsignal's Rules Engine, showing how you can create risk-based logic to determine when and how users are challenged.
.svg)