Contact salesSign inSign up
AuthsignalAuthsignal
Product
Passwordless / multi-factor authentication (MFA)
Drop-in authentication
Passkeys
Biometric authentication
Risk-based authentication
WhatsApp OTP
Authenticator apps (TOTP)
App verification
Push verificationQR code verificationIn-app verification
SMS OTP
Email OTP
Magic links
See all authenticators
See less authenticators
Palm biometrics
Contactless payments & identity verification
Flexible integration modes
Pre-built UI
Low code
UI components
Customizable
Custom UI
Flexible
Digital credentials API Beta
Authenticate customers instantly using digital credentials
Session management
Keep users signed in across web and mobile after authentication
Fraud Controls
Rules and policies engine
Step-up authentication
No-code rule creation
Risk alerts
User observability
Audit trails
Dynamic linking
Why Authsignal?
Complete authentication infrastructure from enrollment to step-up auth, modular by design
Solutions
By USE CASE
View All
Account takeovers (ATO)
Go passwordless
Call center
SMS cost optimization
Existing apps
QR code payments
Step-up MFA
Palm biometrics payments
By INDUSTRY
View All
Financial services
Marketplace
e-Commerce
FinTech
Crypto
Healthcare
By Integration (identity provider)
Amazon Cognito
Azure AD B2C
Duende IdentityServer
Keycloak
Auth0
NextAuth.js
Custom identity provider
By ROLe
Engineers
Product
Passwordless / Multi-factor Authentication (MFA)
Flexible Integration Modes
Pre-built UI · Low code
UI Components · Customizable
Custom UI · Flexible
Digital credentials API Beta
Authenticate customers instantly using digital credentials
Session management
Issue JWT access and refresh tokens
Why Authsignal?
Plug in Authsignal to elevate your IDP — effortless integration with any architecture.
Drop-in Authentication
Passkeys
Biometric authentication
WhatsApp OTP
Risk-based authentication
SMS OTP
Email OTP
Magic links
Authenticator apps (TOTP)
Push notifications
App verification
Push verificationQR code verificationIn-app verification
Palm Biometrics
Contactless payments & identity verification
Fraud Controls
Rules and Policies Engine
Step-up Authentication
No Code Rule Creation
Risk Alerts
User Observability
Audit Trails
Use Cases
Financial services
Account takeovers (ATO)
Marketplace
Go passwordless
e-Commerce
Solutions
By Use Case
Account takeovers (ATO)
Go passwordless
Call center
SMS cost optimization
Existing apps
QR code payments
Step-up MFA
Palm Biometric Payments
View all Use Cases
By Industry
Financial services
Marketplace
e-Commerce
FinTech
Crypto
Healthcare
View all Industries
By Integration (identity provider)
Amazon Cognito
Azure AD B2C
Duende IdentityServer
Keycloak
Auth0
NextAuth.js
Custom identity provider
By Role
Engineers
PricingAboutDocsBlog
Schedule a call
Try Authsignal
AUS Flag

Authsignal secures millions of passkey transactions out of our hosted Sydney region.

AUS Flag

Authsignal secures millions of passkey transactions out of our hosted Sydney region.

Join us today!
Right icon
Blog
/
Current article
Passkeys
Step up authentication
Implementation

How to add passkey step-up auth in your app?

Ashutosh Bhadauriya
⬤
June 10, 2025
Share
How to add passkey step-up auth in your app?

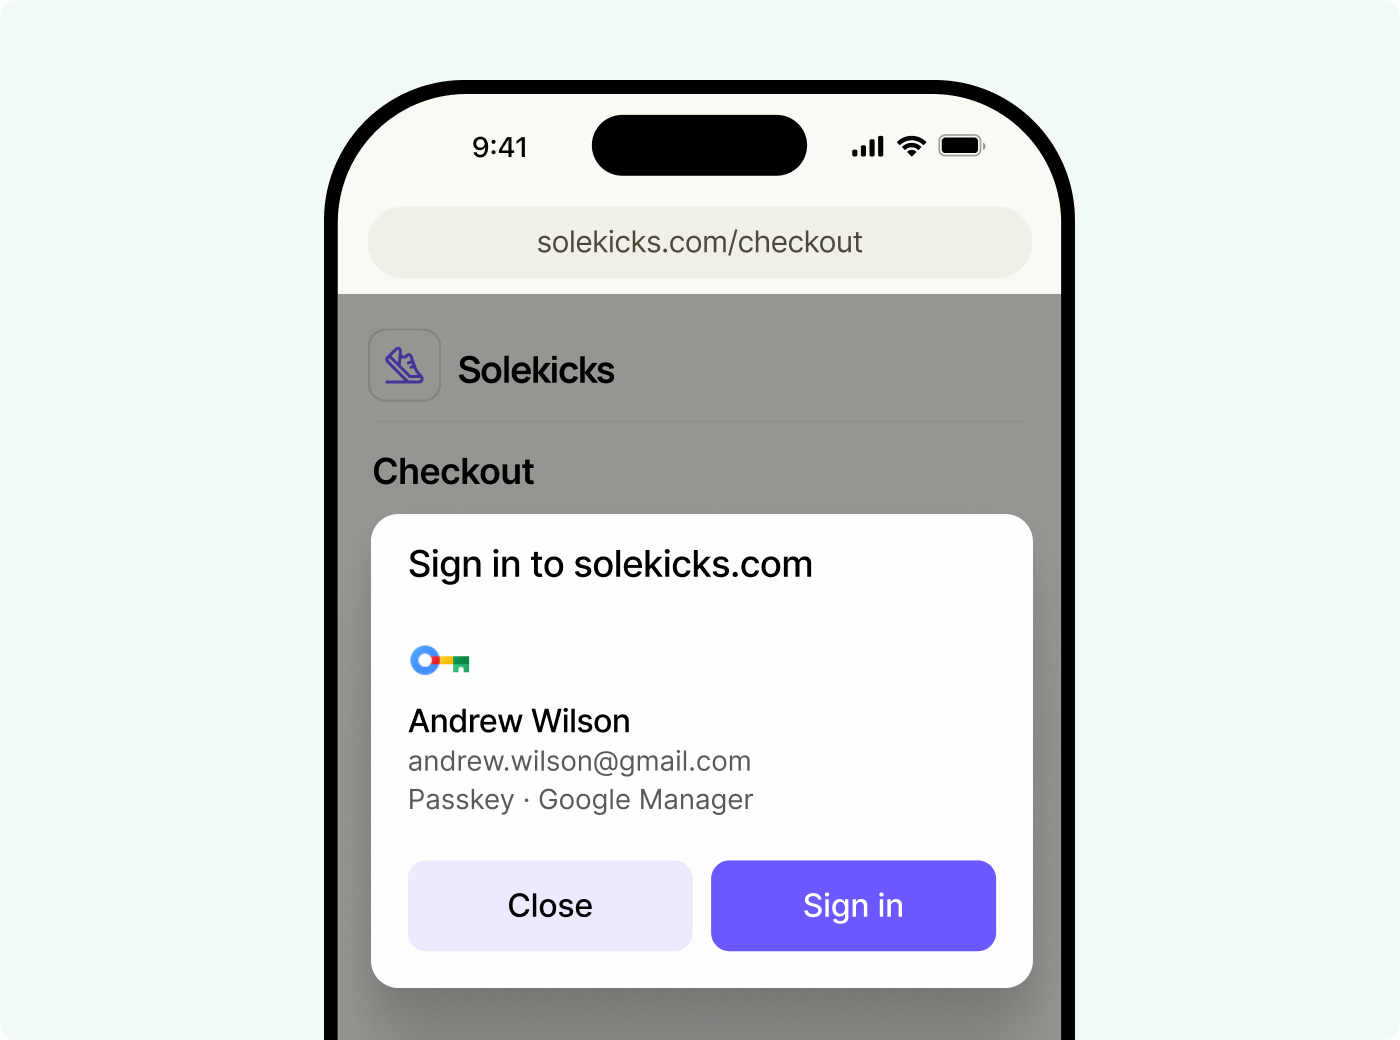
You must have come across a moment when you're in your banking app, about to transfer a large amount of money, and suddenly it asks you to verify your identity again. Maybe it sends you an SMS code, asks for your password, or prompts for additional security questions. That's step-up authentication in action.

The idea is simple: routine actions get minimal friction, but sensitive operations require extra verification. It's a smart security pattern that balances usability with protection.But traditional step-up methods have problems. SMS codes can be intercepted. Passwords get forgotten or stolen. Security questions are often terrible. Users end up frustrated, and security teams worry about vulnerabilities.

Passkeys offer a better way. They're fast, secure, and users already understand the interaction. Instead of typing codes or remembering passwords, users just touch their fingerprint or look at their phone. The user experience is smooth, and there's nothing for attackers to steal.

‍

What we're building

Let's build a practical example: a money transfer app that uses passkeys for step-up authentication. Here's how it works:

  • Small transfers (under $5,000): go through immediately
  • Large transfers (over $5,000): require passkey verification

The user experience feels natural. Small transfers are frictionless. Large transfers get one quick biometric check.

‍

Architecture overview

Before we start coding, let's understand how the pieces fit together. We’ll be using Authsignal for our passkey step-auth implementation. The app has four main components:

Passkey enrollment: This is where users register their biometric with your app.

Transaction check: Every time someone initiates a transfer, we evaluate whether it needs extra verification. This is where your business logic lives. Amount thresholds, user risk levels, recipient verification - whatever rules make sense for your application.

Step-Up Challenge: When extra verification is needed, we present the passkey prompt.

Validation: After the user completes the passkey flow, we need to verify on the server that it actually happened. This prevents client-side tampering and gives us an audit trail.

‍

Github repo

All the code for this implementation is available in our GitHub repository. You can clone it, run it locally, and adapt it for your own use case.

This implementation uses Next.js, but no worries if that's not your stack. We have SDKs for Python, Ruby, Go, PHP, and other platforms that follow the same approach with language-specific examples. Head to our docs for examples in your preferred language.

‍

Let’s get to building

First, we need to configure Authsignal in our application.

‍

Install the required packages:

npm install @authsignal/node @authsignal/browser

‍

Set up your configuration:

// lib/authsignal.ts
import { Authsignal } from '@authsignal/node'

export const authsignal = new Authsignal({
  apiSecretKey: process.env.AUTHSIGNAL_API_SECRET_KEY,
  apiUrl: 'https://api.authsignal.com/v1', // your region api url
})

export const authsignalConfig = {
  tenantId: process.env.NEXT_PUBLIC_AUTHSIGNAL_TENANT_ID,
  baseUrl: 'https://api.authsignal.com/v1', // your region api url
}

‍

The server-side config handles authentication and API calls to Authsignal. The client-side config allows your frontend to communicate with Authsignal's browser SDK.

‍

Passkey enrollment

Before users can verify high-value transactions, they need to enroll a passkey. This is a one-time setup that registers their biometric authentication method with your application.

The enrollment process has three steps: request permission, create the passkey, and validate success. Let’s build each part

‍

Backend enrollment endpoint:

// api/passkey/enroll/route.ts
export async function POST(request: NextRequest) {
  const userId = await getUserId()

// Tell Authsignal we want to start passkey enrollment for this user
  const response = await authsignal.track({
    userId,
    action: 'enroll-passkey',
    attributes: { scope: 'add:authenticators' },
  })

// Return a token that authorizes the frontend to proceed
  return NextResponse.json({ token: response.token })
}

‍

Only generate tokens with the add:authenticators scope in strongly authenticated contexts. Generating this token from an unauthenticated endpoint creates a security vulnerability where attackers could potentially enroll authenticators for other users.

Frontend enrollment flow:

// components/passkey-manager.tsx
const enrollPasskey = async () => {
  try {
// Step 1: Get permission to enroll
    const challengeResponse = await fetch('/api/passkey/enroll', {
      method: 'POST',
      body: JSON.stringify({ userId }),
    })
    const { token } = await challengeResponse.json()

// Step 2: Create the passkey using browser APIs
    const passkeyResponse = await authsignalClient.passkey.signUp({
      token,
      username: userEmail,
      displayName: userEmail. // can skip it, if both userName and displayName are same
    })

// Step 3: Validate that enrollment succeeded
   if (passkeyResponse.data?.token) {
        // Step 3: Validate the passkey creation on server
        const validationResponse = await fetch('/api/passkey/validate', {
          method: 'POST',
          headers: { 'Content-Type': 'application/json' },
          body: JSON.stringify({ token: passkeyResponse.data.token }),
        })

        if (validationResponse.ok) {
          setIsEnrolled(true)
          setMessage({ type: 'success', text: 'Passkey successfully enrolled!' })
        } else {
          throw new Error('Failed to validate passkey')
        }
      }
    } catch (error) {
      console.error('Passkey enrollment error:', error)
      setMessage({ 
        type: 'error', 
        text: error instanceof Error ? error.message : 'Failed to enroll passkey' 
      })
  }
}

Here's what happens from the user's perspective: they click "Set up passkey," their device prompts for Touch ID or Face ID, and then they see a success message.

The username and displayName parameters help users identify the passkey later if they manage multiple accounts. Use email addresses or usernames that users will recognise.

‍

Transaction verification check

Decide when to require step-up auth based on transfer amount:

// api/passkey/verify-transaction/route.ts
export async function POST(request: NextRequest) {
	const userId = await getUserId()
  const { amount, recipient } = await request.json()

// Small transfers go through
  if (amount <= 5000) {
    return NextResponse.json({
      requiresVerification: false,
      message: 'Transaction approved'
    })
  }

// Large transfers need verification
  const response = await authsignal.track({
    userId,
    action: 'high-value-transfer',
  })

  if (response.state === 'CHALLENGE_REQUIRED') {
    return NextResponse.json({
      requiresVerification: true,
      token: response.token,
      state: response.state,
    })
  }
}

‍

Step-up challenge

When verification is needed, prompt for passkey:

// components/passkey-challenge.tsx
const performPasskeyVerification = async () => {
  try {
    const passkeyResponse = await authsignalClient.passkey.signIn({
      action: 'high-value-transfer'
    })

    if (passkeyResponse.data?.token) {
      const validationResponse = await fetch('/api/passkey/validate', {
        method: 'POST',
        body: JSON.stringify({ token: passkeyResponse.data.token }),
      })

      const validationData = await validationResponse.json()

      if (validationData.isValid) {
        onVerificationComplete(true, 'Verification successful')
      }
    }
  } catch (error) {
    if (error.message.includes('user_canceled')) {
      onVerificationComplete(false, 'Verification cancelled')
    } else if (error.message.includes('no_credential')) {
      onVerificationComplete(false, 'No passkey found on this device')
    }
  }
}

The action parameter connects the server challenge to the client verification.

‍

Validation

Confirm that passkey verification actually happened:

// api/passkey/validate/route.ts
export async function POST(request: NextRequest) {
  const { token } = await request.json()

  const response = await authsignal.validateChallenge({ token })

  return NextResponse.json({
    state: response.state,
    isValid: response.state === 'CHALLENGE_SUCCEEDED',
    userId: response.userId,
  })
}

‍

Complete flow

High-value transfer ($7,500):

  1. User enters transfer details
  2. App detects high value, calls verification endpoint
  3. Server responds with challenge token
  4. App prompts for passkey
  5. User provides biometric
  6. App validates token with server
  7. Transfer proceeds

Low-value transfer ($50):

  1. User enters transfer details
  2. App detects low value
  3. Transfer proceeds immediately

We recommend only enrolling passkeys after users have already enrolled with another authentication factor (like email OTP, SMS, or authenticator app).

‍

Extensions

You can use this pattern for any sensitive action:

  • Password changes
  • Data exports
  • Admin operations
  • Account deletions

You can also add risk-based triggers beyond just amount thresholds, like unusual locations or recipient verification.

‍

Wrapping up

Implementing passkey-based step-up authentication might seem complex, but with Authsignal handling the heavy lifting, it's pretty straightforward. The combination of strong security and excellent user experience makes passkeys ideal for protecting high-value transactions.

The key is to start simple, implement basic passkey enrollment and verification, then gradually add sophistication based on your users' needs. With the foundation we've built here, you're well on your way to providing bank-grade security for your most critical operations.

Ready to implement passkeys in your own application? Check out the Authsignal documentation and start building!

Question icon
Have a question?
Talk to an expert
NewsletterDemo PasskeysView docs
Passkeys
Step up authentication
Implementation

You might also like

Why pension funds are turning to liveness detection for presence verification
Liveness Detection
Identity Verification
Fraud prevention

Why pension funds are turning to liveness detection for presence verification

April 21, 2026
How a global real estate company strengthened MFA with Authsignal
Azure AD B2C
Multi-factor authentication
Passkeys

How a global real estate company strengthened MFA with Authsignal

April 14, 2026
What is Visa VAMP? Thresholds, fees, and how it affects your dispute ratio
Visa VAMP
Chargebacks
Dispute Management

What is Visa VAMP? Thresholds, fees, and how it affects your dispute ratio

April 13, 2026

Secure your customers’ accounts today with Authsignal

Passkey demoCreate free account
Authsignal Purple Logo

Authsignal delivers passwordless and multi-factor authentication as a service. Focused on powering mid-market and enterprise businesses to rapidly deploy optimized good customer flows that enable a flexible and risk-based approach to authentication.

AICPA SOCFido Certified
LinkedInTwitter
Passwordless / multi-factor authentication (MFA)
Pre-built UI (low code)UI components (customizable)Custom UI (flexible)
Why Authsignal?
Drop-in authentication
Risk-based authentication PasskeysBiometric authenticationWhatsApp OTPSMS OTPEmail OTPMagic linksAuthenticator apps (TOTP)Push authenticationPalm biometricsDigital Credential Verification API
Rules and policies engine
User observability
Industries
Financial services
Marketplace
e-Commerce
FinTech
Crypto
View all industries
Teams
Engineers
Use cases
Account takeovers (ATO)
Go passwordless
Call center
SMS cost optimization
Existing apps
View all use cases
Identity providers (IDPs)
Amazon Cognito
Auth0
Azure AD B2C
Custom identity provider
Duende IdentityServer
Keycloak
NextAuth.js
Integrations
ASP.NET
C#
Java
Node.js
Open ID Connect (OIDC)
PHP
Python
React
Ruby
Ruby on Rails
Compare
Twilio Verify vs AuthsignalAuth0 vs AuthsignalAWS Cognito vs Authsignal + AWS Cognito
Resources
BlogDeveloper docsFree Figma mobile passkeys templateFree Figma desktop passkeys templateFree Figma webapp passkeys template
Company
About usWhy AuthsignalCareersPress releasesPartnersContact us
What is
SMS OTP
Risk Based Authentication
IP Spoofing
Passwordless authentication
Multi-Factor Authentication (MFA)
United States
+1 214 974-4877
Ireland
+353 12 676529
Australia
+61 387 715 810
New Zealand
+64 275 491 983
© 2026 Authsignal - All Rights Reserved
Terms of servicePrivacy policySecuritySystem statusCookies