.avif)
In our previous blog, we explored how you can use passkeys for step-up authentication, providing biometric verification for high-value transactions. Today, we're taking that concept further by diving into adaptive MFA, where security decisions are made intelligently based on real-time risk assessment rather than fixed rules.
Imagine you're using your banking app at home, transferring $500 to pay rent. The transaction goes through seamlessly. Later, you're on vacation connecting through a public WiFi to send $100 to a friend, and suddenly you're prompted for additional verification. That's adaptive MFA in action.
Unlike traditional step-up authentication that only looks at transaction amounts, adaptive MFA considers multiple risk factors: Are you connecting from an anonymous IP? Are you in an unusual location? Is this transaction pattern normal for you? A $10,000 transfer from your home IP might be perfectly safe, while a $50 transfer from an anonymous VPN could signal account compromise.
What we're building
We’ll build a smart money transfer app that adapts its security based on real-time risk assessment. Here's how our adaptive MFA in the app works:
Anonymous/risky IPs: Always require passkey verification for connections from VPNs, Tor, or suspicious IP rangesTrusted IPs + high value: Require verification for transactions over $2,000 from known good IPsTrusted IPs + low value: Allow transactions to proceed seamlessly
This way, your regular IP addresses will become trusted over time, while suspicious network activity gets flagged immediately.
Architecture overview
The system has four key components:
IP Risk Assessment: Authsignal automatically identifies anonymous IPs, VPNs, Tor networks, and suspicious IP ranges.
Risk Assessment: Every transaction is evaluated against configurable rules that consider IP reputation, transaction amount, and other risk factors.
Adaptive Challenge: When risk is detected, users get a passkey prompt. Low-risk transactions flow through without friction.
Continuous Learning: The system learns IP patterns over time, reducing false positives while maintaining security.
Set up rules in Authsignal
Before we dive into the code, we need to configure our adaptive MFA rules in the Authsignal Portal.
Create the action: Navigate to the Actions section in your Authsignal dashboard and create a new action called adaptive-mfa-transfer.
Create and configure rules: Head to the Rules tab and set up your risk-based conditions. Set the outcome to "Challenge" and add these conditions. Don’t forget to set the rule outcome to ‘Challenge’.
IP is anonymous = True→ ChallengetransactionValue > 2000→ Challenge
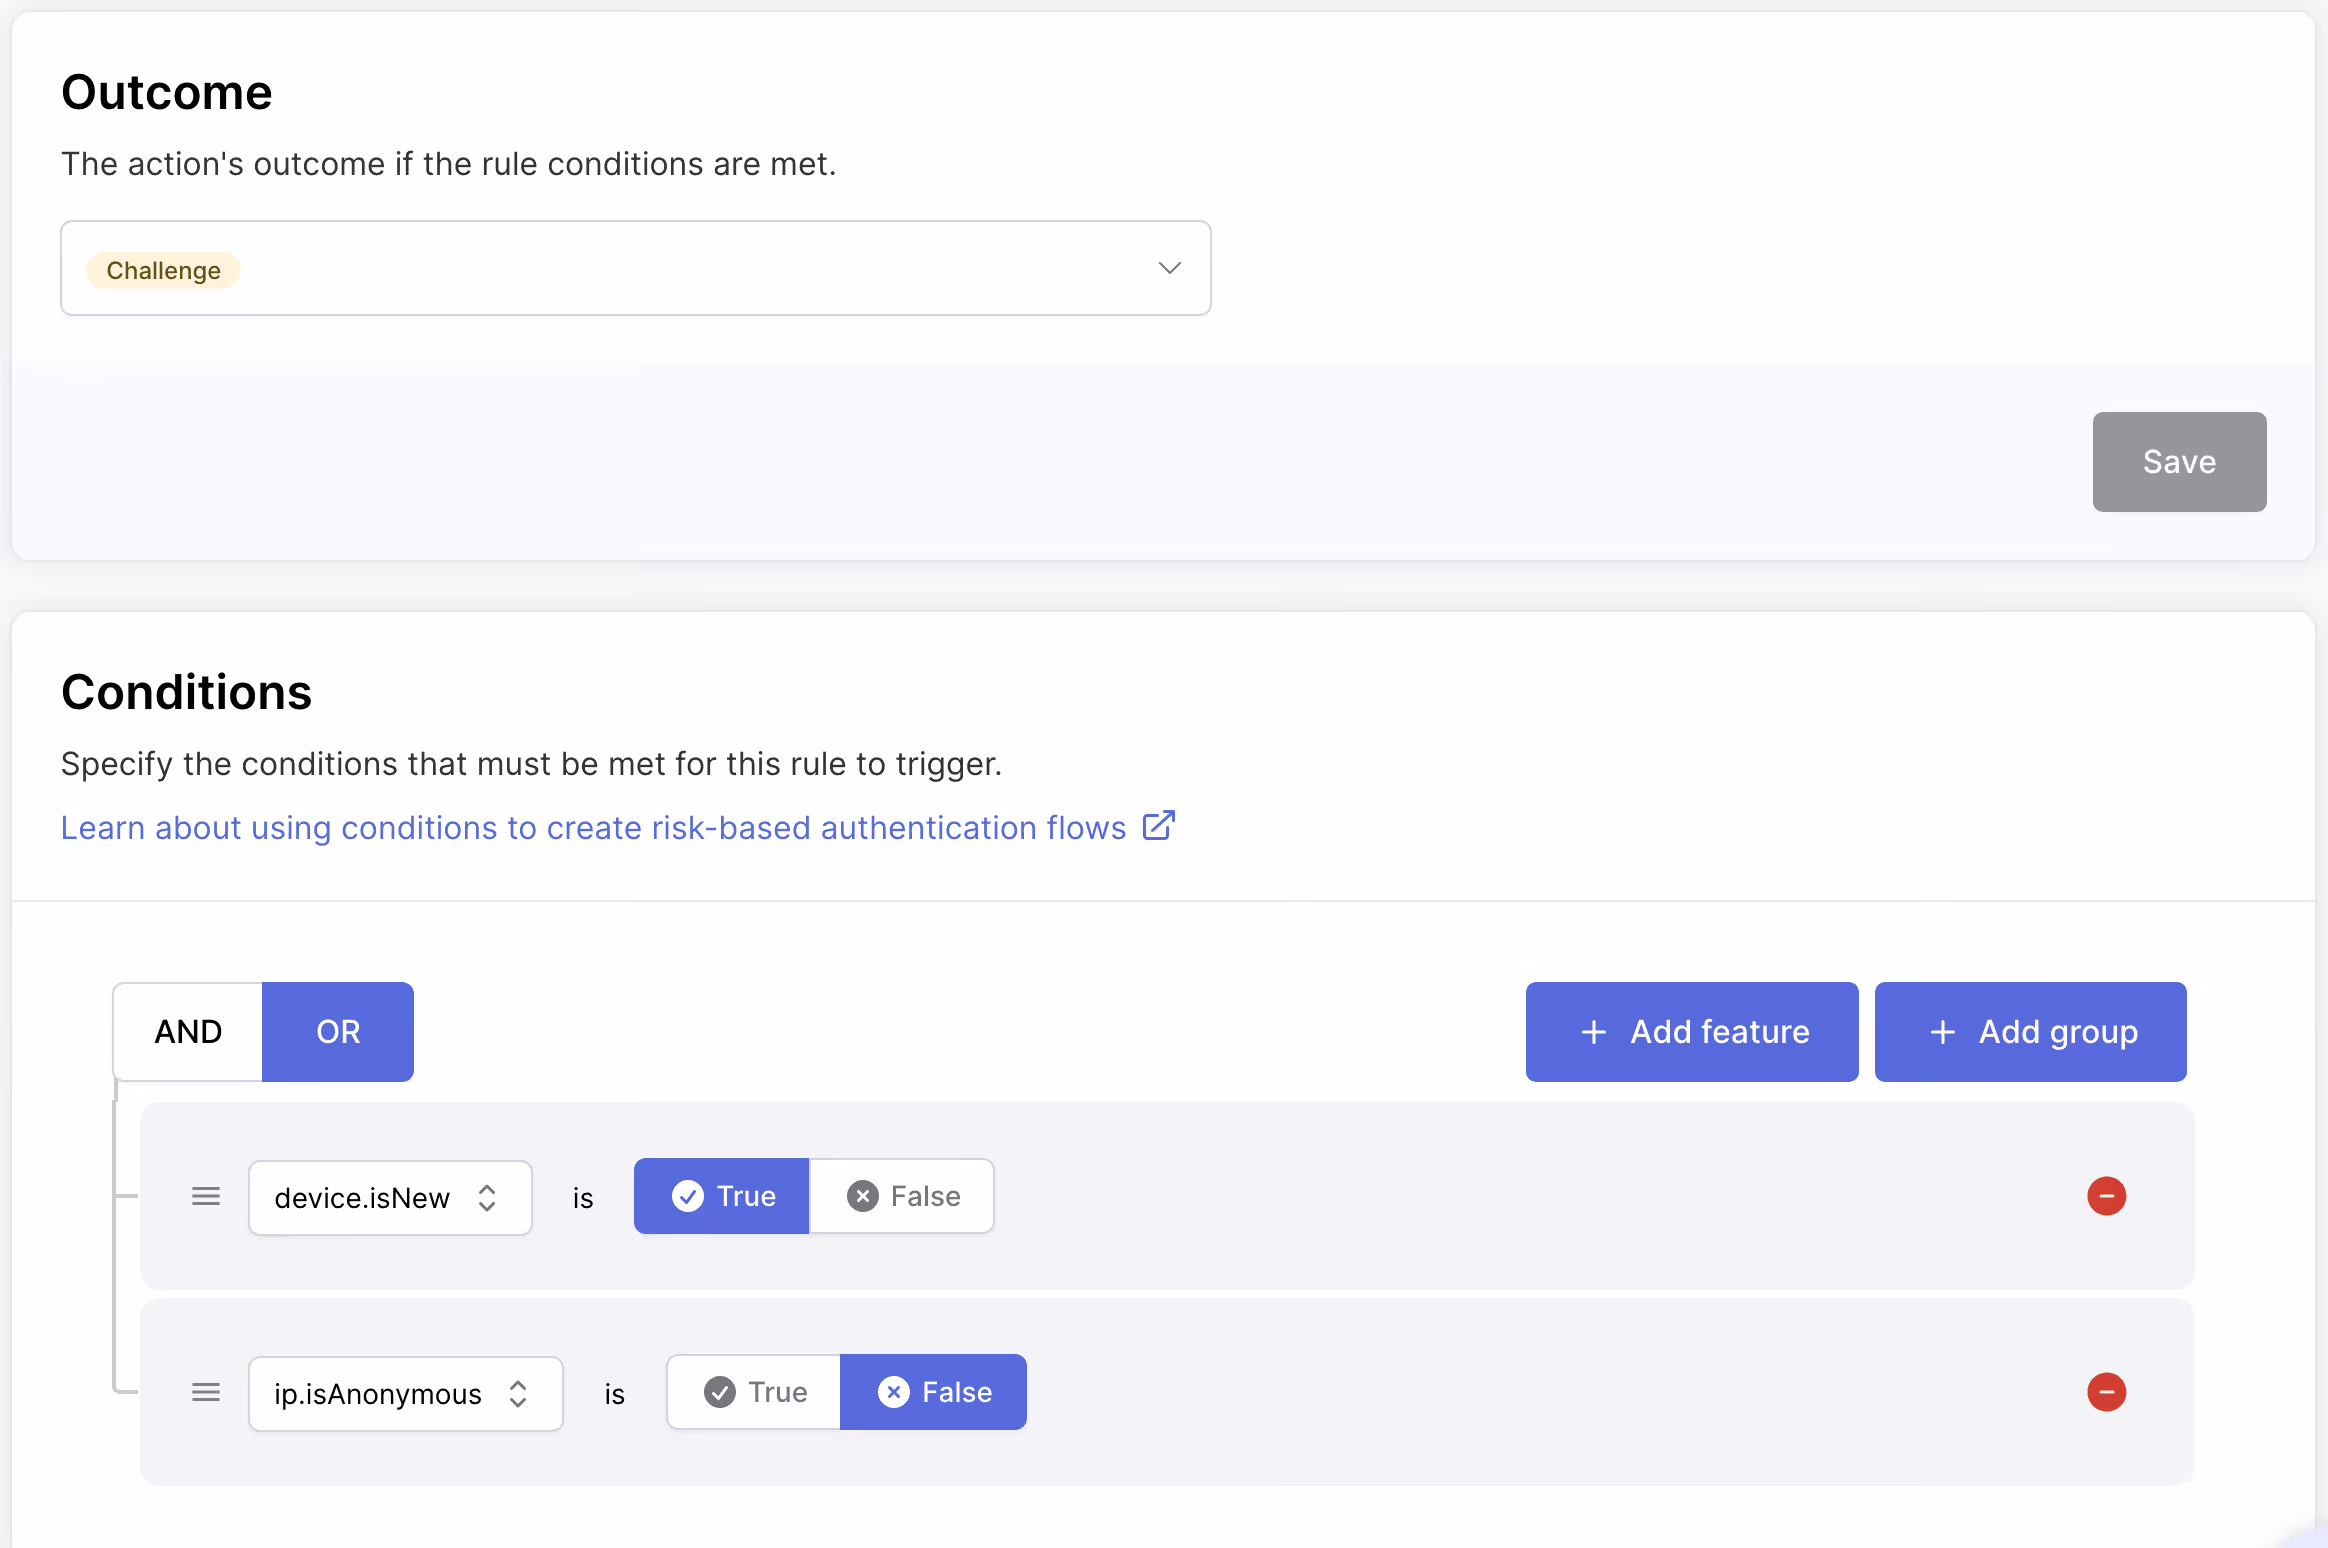
This means users will be prompted for verification when connecting from anonymous IPs or when making high-value transfers from trusted networks.
Implementation
Now, let's build the app:
Install packages:
npm install @authsignal/node @authsignal/browser
Grab your Authsignal credentials:
// lib/authsignal.ts
import { Authsignal } from '@authsignal/node'

export const authsignal = new Authsignal({
  apiSecretKey: process.env.AUTHSIGNAL_API_SECRET_KEY,
  apiUrl: 'https://api.authsignal.com/v1', // your region api url
})

export const authsignalConfig = {
  tenantId: process.env.NEXT_PUBLIC_AUTHSIGNAL_TENANT_ID,
  baseUrl: 'https://api.authsignal.com/v1', // your region api url
}
Passkey enrollment
Before adaptive MFA can work, users need passkeys enrolled.
Backend enrollment endpoint:
// api/passkey/enroll/route.ts
export async function POST(request: NextRequest) {
  const userId = await getUserId()

  // Tell Authsignal we want to start passkey enrollment
  const response = await authsignal.track({
    userId,
    action: 'enroll-passkey',
    attributes: { scope: 'add:authenticators' },
  })

  return NextResponse.json({ token: response.token })
}
Frontend enrollment flow:
// components/passkey-manager.tsx
const enrollPasskey = async () => {
  try {
    // Step 1: Get enrollment token
    const challengeResponse = await fetch('/api/passkey/enroll', {
      method: 'POST',
      headers: { 'Authorization': `Bearer ${authToken}` }
    })
    const { token } = await challengeResponse.json()

    // Step 2: Create passkey
    const passkeyResponse = await authsignalClient.passkey.signUp({
      token,
      username: userEmail,
    })

    // Step 3: Validate enrollment
    if (passkeyResponse.data?.token) {
      const validationResponse = await fetch('/api/passkey/validate', {
        method: 'POST',
        body: JSON.stringify({ token: passkeyResponse.data.token }),
      })

      if (validationResponse.ok) {
        setIsEnrolled(true)
        setMessage('Passkey successfully enrolled!')
      }
    }
  } catch (error) {
    console.error('Enrollment failed:', error)
  }
}
Adaptive MFA Implementation
Transaction verification:
// api/passkey/verify-transaction/route.ts
export async function POST(request: NextRequest) {
  const userId = await getUserId()
  const { amount, recipient } = await request.json()

  // Get client context
  const userAgent = request.headers.get('user-agent') || ''
  const ipAddress = request.headers.get('x-forwarded-for') ||
                   request.headers.get('x-real-ip')

  // Let Authsignal evaluate risk and decide
  const response = await authsignal.track({
    userId,
    action: 'adaptive-mfa-transfer',
    attributes: {
      userAgent,
      ipAddress,
      custom: {
        transactionValue: amount
      }
    }
  })

  if (response.state === 'CHALLENGE_REQUIRED') {
    return NextResponse.json({
      requiresVerification: true,
      token: response.token,
      message: `Security verification required for ${amount.toFixed(2)} transfer`
    })
  } else if (response.state === 'ALLOW') {
    return NextResponse.json({
      requiresVerification: false,
      message: 'Transaction approved'
    })
  }
}
Challenge the user
// components/passkey-challenge.tsx
const performPasskeyVerification = async () => {
  try {
    // Perform passkey authentication
    const passkeyResponse = await authsignalClient.passkey.signIn({
      action: 'adaptive-mfa-transfer'
    })

    if (passkeyResponse.data?.token) {
      // Validate the verification
      const validationResponse = await fetch('/api/passkey/validate', {
        method: 'POST',
        body: JSON.stringify({ token: passkeyResponse.data.token }),
      })

      const validationData = await validationResponse.json()

      if (validationData.isValid) {
        onVerificationComplete(true, 'Verification successful! Transaction approved.')
      }
    }
  } catch (error) {
    // Handle error

  }
}
Different adaptive MFA scenarios
Scenario 1: Anonymous IP, any amount ($100)
- User connects via VPN and enters transfer details
- Authsignal detects anonymous/VPN IP address
IP is anonymous = Truerule triggers- User prompted for passkey verification
- After successful verification, transaction proceeds
Scenario 2: Trusted IP, high amount ($3,000)
- User enters large transfer from home IP
- Authsignal recognizes trusted IP but sees high amount
transactionValue > 2000rule triggers- User prompted for passkey verification
- Transfer proceeds after verification
Scenario 3: Trusted IP, normal amount ($500)
- User enters regular transfer from home/office IP
- Authsignal recognizes trusted IP and sees normal amount
- No rules trigger
- Transfer proceeds immediately
Scenario 4: Tor network, any amount
- User connects through Tor browser
- Authsignal detects Tor exit node IP
IP is anonymous = Truerule triggers- Verification required regardless of amount
Extensions and customization
You can enhance adaptive MFA with additional risk signals:
Geographic risk: New countries or impossible travel detection
Network analysis: VPN detection and IP reputation scoring
Velocity checks: Rapid successive transactions from different devices
Business context: Different thresholds for different user types or account balances
Wrapping up
That's it! We've built a smart money transfer app with adaptive MFA that responds intelligently to risk. A $10,000 transfer from your home IP is fundamentally different from a $100 transfer from an anonymous VPN. Adaptive MFA recognizes these differences and responds appropriately.
Check out the Authsignal adaptive MFA docs to start implementing it in your app!
.svg)


