.avif)
Before we dive into the technical details, let me quickly explain what passkeys are. Think of them as more secure alternatives to passwords that use biometrics (like your fingerprint or face) or device PINs instead of typed passwords. They're phishing-resistant, easy to use, and are becoming the gold standard for modern authentication.
This is a continuation of Authsignal's guide on adding MFA to Keycloak. In this guide, we’ll be extending the MFA example to add passkeys to your Keycloak authentication flow. As a bonus step, we'll then add passkey autofill, which creates an incredibly smooth login experience for your users.
Here’s what the flow looks like
Getting Started
Important: This guide assumes you've already completed the initial Authsignal integration with Keycloak. If you haven't set up the basic MFA implementation yet, please start with our previous guide first, then come back here to add passkeys.
Before we dive into code, there are a couple of essential prerequisites we need to set up in our Authsignal account.
Setting Up Your Custom Domain
First things first: you'll need to configure a custom domain in the Authsignal Portal. This is crucial for passkeys because they are strictly domain-bound for security reasons. They can only be used on the same domain (or subdomain) where they were originally registered.
To set up your custom domain:
- Log into your Authsignal dashboard
- Navigate to Settings → Pre-built UI → Custom Domains
- Add your domain and verify your ownership

Enabling Passkey Authentication
Once your custom domain is ready, the next step is to enable passkey authentication in your Authsignal portal, for that you’ll need to first enable passkey on your tenant and then enable passkey uplift flow.
Set up passkeys on your tenant
Once your custom domain is ready, the next step is to enable passkey authentication in your Authsignal portal:
- Go to Settings → Authenticators
- Choose "Passkey" from the list of available authenticators
- Click on “Set up Passkey ” and Enter your app's top-level domain in the "Relying Party ID" field on the next screen (for example,
authsignallabs.com)- This is critical! The Relying Party ID should be your root domain, not a subdomain
- This allows passkeys to work across all subdomains of your main domain
- Click "Activate passkeys" to proceed to additional settings
- On the next screen, configure "Expected origins" - these are the domains where your passkeys will be used. For now ensure that you add your custom domain, e.g.example
https://keycloak-demo.authsignallabs.com
Enable passkey uplift flow
- Navigate to the Actions Section in your Authsignal Portal dashboard.
- If you have already tested your existing Authsignal + Keycloak integration, you should see an action called ”Sign in**”**.
- Click the “Sign in” action and in the settings tab of sign in action, scroll down to the “Prompt users to add a passkey” section.
- Toggle the “Prompt users to add a passkey” switch to “on”.

Testing Your Passkey Enrollment
Once you've completed the passkey configuration, test the setup by logging into your application and going through the MFA flow. You should see the passkey enrollment option in Authsignal's pre-built UI. Register a passkey using your device's authentication method.
Once registered, you'll automatically be prompted to use passkey for MFA, creating a more seamless authentication experience.
Implementing Passkey Autofill
Now that passkey enrollment is working, let's implement passkey autofill. This feature streamlines the login experience by allowing users to:
1. Click on the username or password input field
2. Select their passkey when prompted
3. Authenticate with their device
4. Complete the login process without entering a password
This approach significantly improves the user experience. The following sections will walk you through the implementation process.
Tweaking Your Keycloak Configuration
Log into your Keycloak admin UI and:
1. Navigate to the Authentication section
2. Click on your custom flow
3. Delete the default username and password flow (yes, really!)

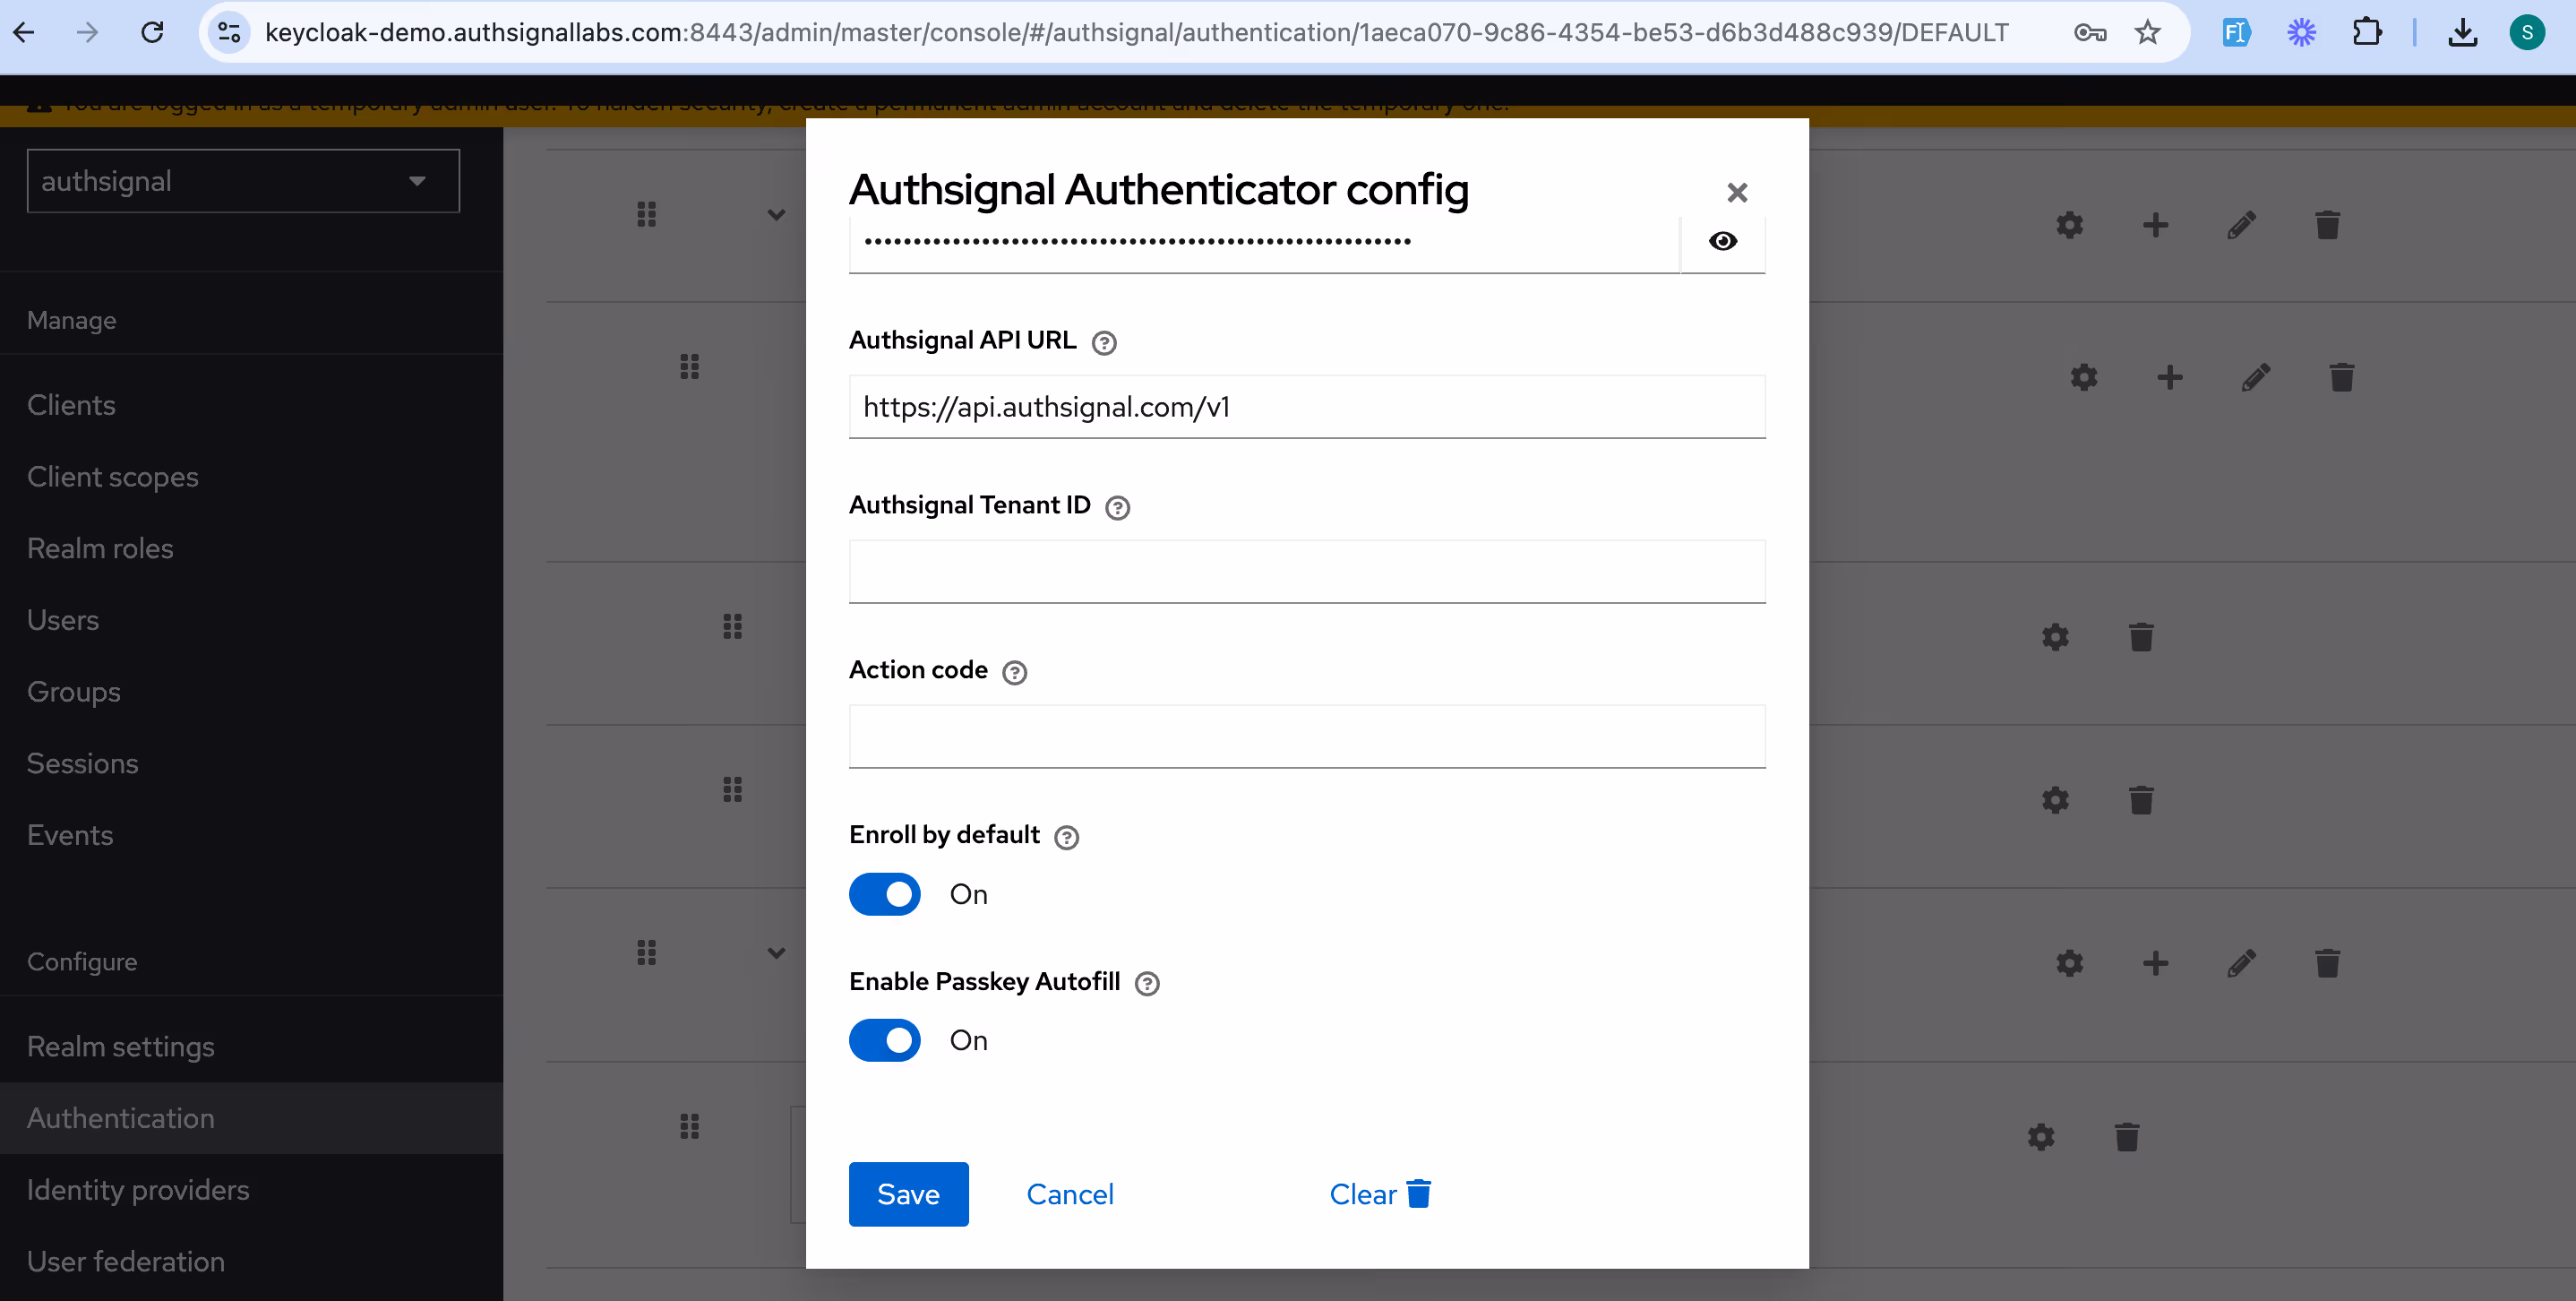
4. Click on the Authsignal Authenticator settings

5. Toggle on "Enable Passkey Autofill"
Customizing the Keycloak Sign-in Page
This is where the magic happens. We need to create a custom theme that integrates with Authsignal's Web SDK.
First, create a new theme folder:
To enable passkey autofill in Keycloak, we need to integrate Authsignal's Web SDK with a custom theme:
- Create a new theme folder on your Keycloak server:
themes/mytheme/login/ - Create a
login.ftlfile in this directory with the following code, this will allow autofill to work when the user clicks the input.
<link rel="stylesheet" href="${url.resourcesPath}/css/styles.css">
<script src="${url.resourcesPath}/js/script.js"></script>
<div class="login-container">
  <div class="login-card">
    <div class="login-header">
      <p>Please enter your credentials to continue</p>
    </div>

    <form action="${url.loginAction}" method="post" class="login-form">
      <div class="form-group">
        <label for="username">Username</label>
        <input
          id="username"
          name="username"
          type="text"
          autocomplete="username webauthn"
          placeholder="Enter your username"
        />
      </div>

      <div class="form-group">
        <label for="password">Password</label>
        <input
          id="password"
          name="password"
          type="password"
          placeholder="Enter your password"
          autocomplete="current-password webauthn"
        />
      </div>

      <button type="submit">Sign In</button>
    </form>
  </div>
</div>
Now create a JavaScript file at themes/mytheme/login/resources/js/script.js with the Authsignal integration code:
function setWebauthnAttribute() {
  var usernameInput = document.getElementById("username");
  var passwordInput = document.getElementById("password");

  const formElement = document.querySelector("form");

  if (usernameInput && passwordInput) {
    usernameInput.setAttribute("autocomplete", "username webauthn");

    // Replace with your Authsignal tenant ID
    var client = new window.authsignal.Authsignal({
      tenantId: "YOUR_TENANT_ID",
      baseUrl: "https://api.authsignal.com/v1",
    });

    client.passkey
      .signIn({ autofill: true })
      .then((response) => {
        if (response) {
          const hiddenTokenInput = document.createElement("input");
          hiddenTokenInput.type = "hidden";
          hiddenTokenInput.name = "token";
          hiddenTokenInput.value = response.token;
          formElement.appendChild(hiddenTokenInput);
          formElement.submit();
        }
      })
      .catch((error) => {
        console.log("error", error);
      });
  }
}

function loadAuthsignalSdk() {
  var script = document.createElement("script");
  script.onload = setWebauthnAttribute;
  script.src = "https://unpkg.com/@authsignal/browser@0.5.2/dist/index.min.js";
  document.head.appendChild(script);
}

document.addEventListener("DOMContentLoaded", loadAuthsignalSdk);
Don't forget to style your form by adding CSS to themes/mytheme/login/resources/css/styles.css.
Activating Your Theme
After restarting your Keycloak server:
- Go to Realm Settings
- Click on Themes
- Select "mytheme" for the Login theme
- Save your changes
Now navigate to your realm's sign-in page (you can find the URL in the Clients section under Home URL), and your new theme with passkey autofill should be ready!
Wrapping Up
And that's it! You've just transformed your Keycloak login experience with passkey autofill. Your users will love how fast they can sign in now, and you'll sleep better knowing your security is stronger. Have you tried it out yet? I'd love to hear how it's working for your team!
.svg)