Platform
Platform
Drop-In Authentication
Passkeys
Phishing-resistant, FIDO2/WebAuthn
Biometric authentication
Face and device-native biometrics
WhatsApp OTP
Global reach, lower cost than SMS
Email OTP
Universal second factor
App push authentication
Native device push notifications
Palm biometrics
Contactless identity verification
All authentication methods
KEY FEATURES
No-code rules engine
Step-up auth, risk policies, alerts
User observability
Audit trails, dynamic linking
Risk-based authentication
Adaptive MFA by context
Session management
Persistent sessions across channels
Digital credentials API
Verify sovereign digital IDs
Pre-built UI
Fastest deployment path
Passkeys
Deploy phishing-resistant passkeys across web and mobile in days
Solutions
Solutions
USE CASE
Account Takeover Prevention
Stop ATO without adding friction
Go Passwordless
Replace passwords with passkeys
Account Recovery
Secure self-service recovery flows
Call Centre Authentication
Verify callers without KBA
SMS Cost Optimisation
Cut OTP costs up to 90%
Existing Apps (Drop-In)
Add auth without re-architecting
Palm biometric payments
Contactless in-store payments
INDUSTRY
Financial Services & Banking
Secure high-value transactions
Healthcare
Authentication for ePHI access
Loyalty Programs
Protect points and member accounts
ROLE
Engineering
Fast integration, flexible SDKs
Product
No-code flows, conversion insights
Cybersecurity
Risk policies, compliance, audit trails
PricingCustomers
Resources
Resources
LEARN
Blog
Guides
Regulatory
Templates
Docs
COMPANY
About Us
Why Authsignal
Partners
Careers
Security
Contact
INTEGRATIONS
Amazon Cognito
Auth0
Azure AD B2C
Custom identity provider
Duende IdentityServer
All integrations
Docs
Start a trial
Book a callLogin
AUS Flag

Authsignal secures millions of passkey transactions out of our hosted Sydney region.

AUS Flag

Authsignal secures millions of passkey transactions out of our hosted Sydney region.

Join us today!
Right icon
Blog
/
Current article
Duende IdentityServer
Passkeys
Passkeys implementation
Passwordless authentication
Guides

How to Add Passkeys to Duende IdentityServer with Authsignal

Ashutosh Bhadauriya
⬤
May 14, 2025
Share
How to Add Passkeys to Duende IdentityServer with Authsignal

In our previous guide, we saw how you can implement multi-factor authentication (MFA) in Duende IdentityServer using Authsignal. Now, let's take your authentication system to the next level by adding passkey support.

Passkeys offer significant advantages over traditional authentication methods:

  • Improved security - Resistant to phishing and credential theft
  • Enhanced user experience - No passwords to remember or type
  • Reduced friction - Faster logins with biometric verification

Let's see how we can implement this powerful authentication method in your existing setup.

‍

Repository Structure

For your convenience, we've published the complete source code with all implementation details on our GitHub repository.

The solution continues to use the two projects from our previous guide:

  • IdentityServer — The authentication server that handles login requests and passkey challenges
    • Runs on https://localhost:5001
    • Contains the Duende IdentityServer core and Authsignal integration
  • WebClient — A sample client application protected by our enhanced authentication
    • Runs on https://localhost:5002
    • Now includes passkey enrollment capabilities

The code samples in this guide are extracted directly from this implementation.

‍

Enrolling a Passkey

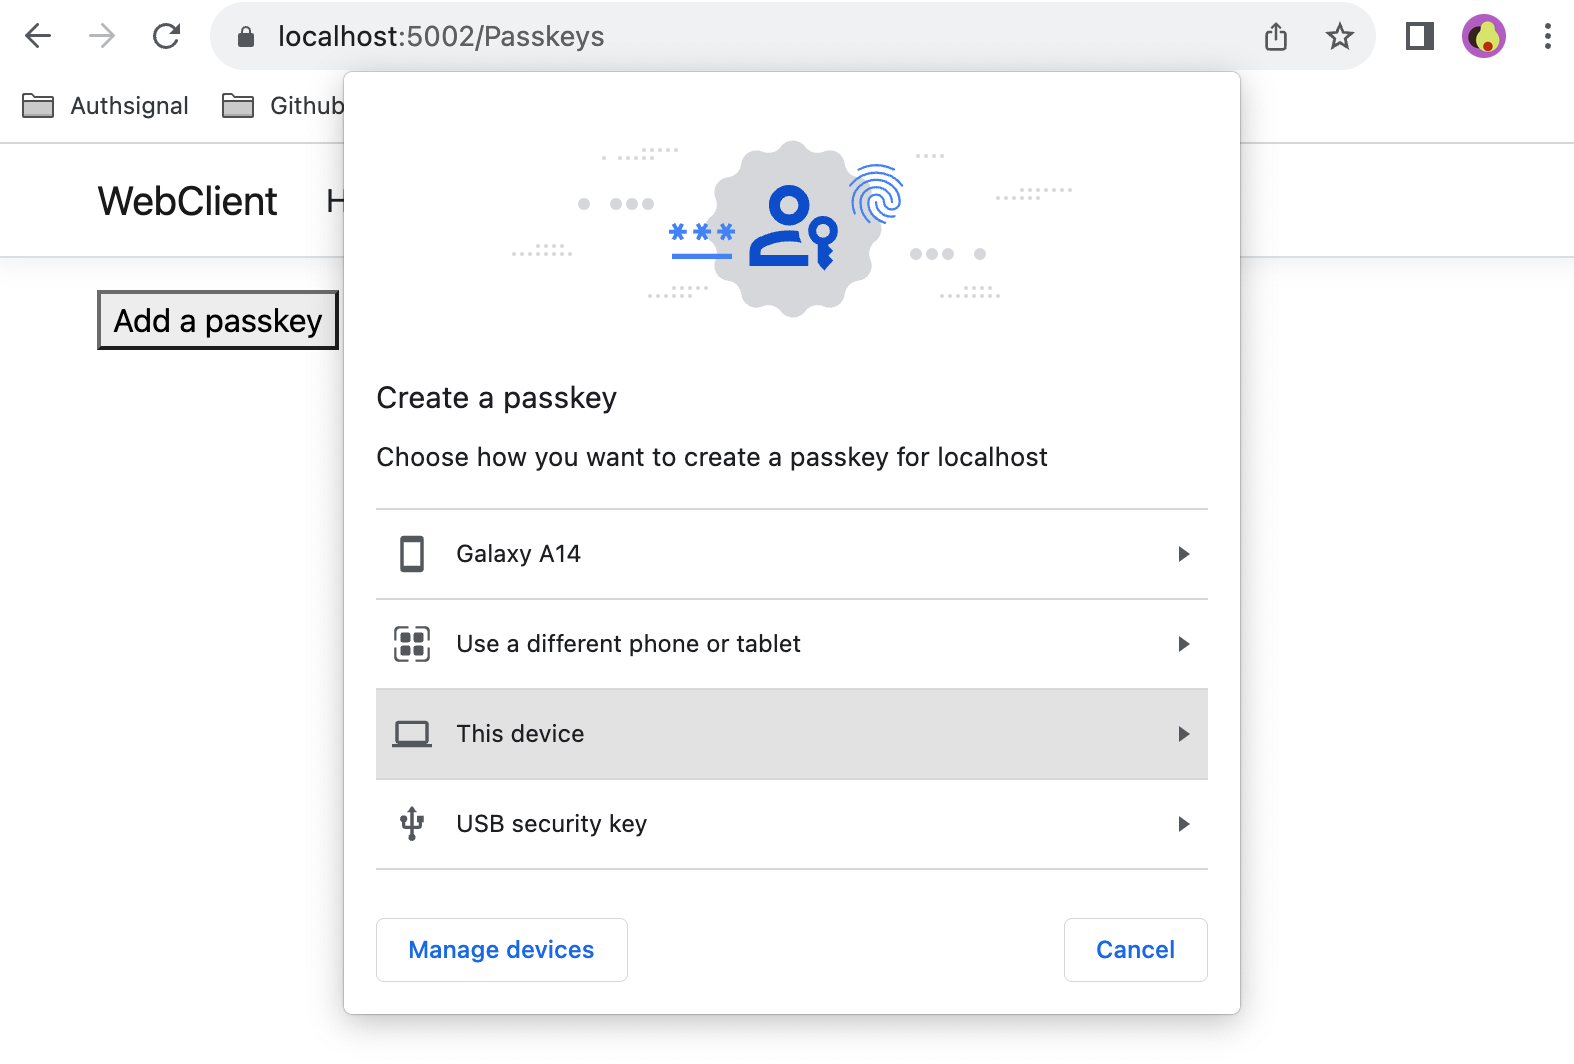
Once a user has logged in with MFA (as we set up in part 1), we can use the Authsignal Web SDK to allow them to add a passkey. This enrollment process will take place in the application server (i.e., the WebClient).
‍

‍

Adding a Passkey Enrollment Page

First, we'll create a dedicated page for passkey management in our WebClient application. Let's implement this by adding a new page:

‍

// From /src/WebClient/Pages/Passkeys.cshtml

@page
@model PasskeysModel

@Html.HiddenFor(m => m.enrollmentToken)

<button id="add-passkey" onClick="addPasskey()">Add a passkey</button>

<script src="https://unpkg.com/@authsignal/browser@0.3.0/dist/index.min.js"></script>
<script src="~/js/passkeys.js"></script>

This page contains a button that will trigger the passkey enrollment process.The hidden field stores the enrollmentToken that our server creates when the page loads.

‍

Generating the Enrollment Token

The enrollmentToken is fetched server-side when the page loads:

// From /src/WebClient/Pages/Passkeys.cshtml.cs 

public async Task<IActionResult> OnGet()
{
  var trackRequest = new TrackRequest(
    UserId: User.Claims.First(x => x.Type == "sub").Value!,
    Action: "add-passkey",
    Attributes: new TrackAttributes(
      Scope: "add:authenticators"
    )
  );

  var trackResponse = await _authsignal.Track(trackRequest);

  this.enrollmentToken = trackResponse.Token;

  return Page();
}

This code:

  • Extracts the user's ID from their claims
  • Creates a track request with the action "add-passkey"
  • Sets a special scope "add" to indicate we're enrolling a new authenticator
  • Stores the resulting token in a property that will be passed to the view
Important note: The enrollment token is only valid for 10 minutes. If a user stays on the passkey enrollment page for longer than that without taking action, the "Add a passkey" button will fail. In a production application, you might want to implement token refresh functionality or provide clear messaging about this limitation.

‍

Client-Side Implementation

Finally, we need to add the client-side JavaScript implementation for the addPasskey function.

‍

// From /src/WebClient/wwwroot/js/passkeys.js

function addPasskey() {
  var client = new window.authsignal.Authsignal({
    tenantId: "YOUR_TENANT_ID",
    baseUrl: "https://api.authsignal.com/v1", // Update for your region
  });

  var token = document.getElementById("enrollmentToken").value;

  client.passkey.signUp({ token }).then((resultToken) => {
    if (resultToken) {
      alert("Passkey added");
    }
  });
}

This:

  • Initializes the Authsignal client with your tenant ID and region
  • Retrieves the enrollment token from the hidden field
  • Calls the passkey.signUp method to trigger the browser's passkey creation flow
  • Shows a simple alert when the passkey is successfully enrolled

‍

Logging in with a Passkey

Now that users can enroll passkeys, we need to update our login page to support passkey authentication. This enhancement gives users the option to use their passkey instead of typing a username and password.

‍

Updating the Login Form

First, we need to ensure that the username input field has the correct autocomplete attribute to support passkey authentication. Modify your login form:

// From /src/IdentityServer/Pages/Account/Login/Index.cshtml

<input
  id="passkey-username"
  class="form-control"
  placeholder="Username"
  asp-for="Input.Username"
  autocomplete="username webauthn"
  autofocus
/>

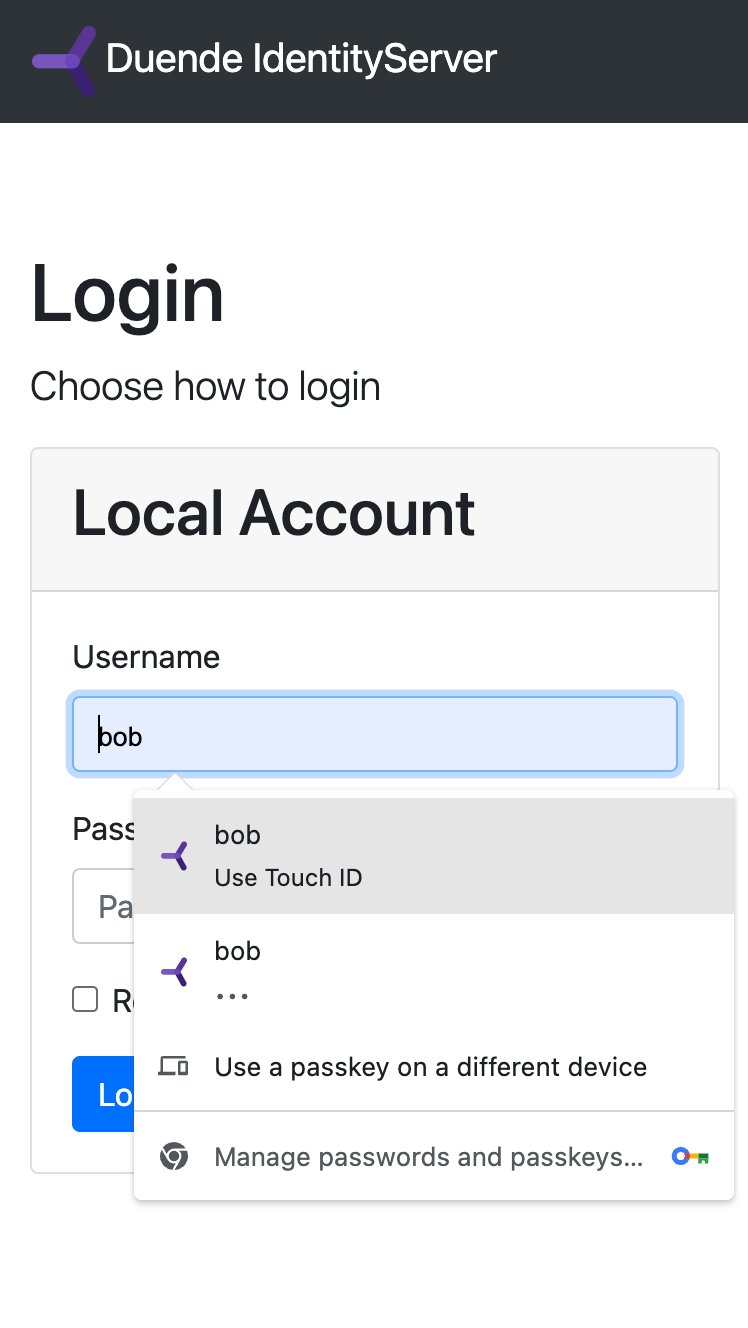
The critical addition here is autocomplete="username webauthn", which tells browsers that this field supports WebAuthn (the underlying technology for passkeys).

‍

Adding Passkey Authentication JavaScript

Next, we need to add JavaScript to initialize passkey authentication when the login page loads:

// From src/IdentityServer/wwwroot/js/login.js

function initPasskeyAutofill() {
  var client = new window.authsignal.Authsignal({
    tenantId: "YOUR_TENANT_ID",
    baseUrl: "https://api.authsignal.com/v1", // Update for your region
  });

  client.passkey.signIn({ autofill: true }).then((token) => {
    if (token) {
      var returnUrl = document.getElementById("Input_ReturnUrl").value;

      window.location = `https://localhost:5001/Account/Login/Callback?returnUrl=${returnUrl}&token=${token}`;
    }
  });
}

if (document.readyState === "loading") {
  document.addEventListener("DOMContentLoaded", initPasskeyAutofill);
} else {
  initPasskeyAutofill();
}

This:

  • Initializes the Authsignal client
  • Calls passkey.signIn with autofill: true to enable the browser's passkey selection
  • When a passkey is successfully used, redirects to our callback endpoint with the resulting token
  • Includes logic to ensure it runs after the DOM is loaded

Don't forget to include this script and the Authsignal SDK in your login page:
<script src="https://unpkg.com/@authsignal/browser@0.3.0/dist/index.min.js"></script>
<script src="~/js/passkey-login.js"></script>

‍

‍

Handling the Passkey Authentication Result

We don't need to modify our callback handler from part 1. The validation process is the same whether the user authenticates with MFA or a passkey. In both cases:

  1. We receive a token (either from the redirect after MFA challenge or directly from the passkey authentication)
  2. We pass this token to our callback page
  3. The callback validates the token using Authsignal's ValidateChallenge method
  4. If validation succeeds, we log the user in

The callback handler we implemented in part 1 already handles this flow perfectly:

// From /src/IdentityServer/Pages/Account/Login/Callback.cshtml.cs

public async Task<IActionResult> OnGet(string returnUrl, string token)
{
  // Decode the Base64-encoded returnUrl
  var decodedReturnUrl = Encoding.UTF8.GetString(Convert.FromBase64String(returnUrl));
  
  if (token == null)
  {
    return Redirect("https://localhost:5001/Account/Login?ReturnUrl=" + decodedReturnUrl);
  }
  
  // Validate the challenge token from Authsignal
  var validateChallengeRequest = new ValidateChallengeRequest(token);
  var validateChallengeResponse = await _authsignal.ValidateChallenge(validateChallengeRequest);
  var userId = validateChallengeResponse.UserId;
  var user = _users.FindBySubjectId(userId);
  
  if (validateChallengeResponse.State != UserActionState.CHALLENGE_SUCCEEDED)
  {
    return Redirect("https://localhost:5001/Account/Login?ReturnUrl=" + decodedReturnUrl);
  }
  
  // Issue authentication cookie and redirect to the original URL
  var isuser = new IdentityServerUser(user.SubjectId) { DisplayName = user.Username };
  await HttpContext.SignInAsync(isuser);
  
  return Redirect(decodedReturnUrl);
}

‍

User Experience

Congrats! Your users now have two ways to log in:

  1. Traditional flow: Enter username and password, then complete MFA challenge
  2. Passkey flow: Select their passkey when focusing on the username field, authenticate with their device (via fingerprint, face recognition, etc.), and skip both password entry and MFA

The passkey flow significantly reduces friction while maintaining strong security, providing the best of both worlds.

‍

Wrapping Up

That's it! You've now enhanced your Duende IdentityServer implementation with passkey support, providing a more secure and user-friendly authentication experience. Your users can enjoy passwordless login while maintaining strong security.

By combining MFA (from part 1) with passkeys, you've created a more secure authentication system that protects against most common attacks while reducing friction for your users.

The complete code for this implementation is available on GitHub.

In the next part of this series, we'll explore how you can use Authsignal to implement a complete passwordless login flow with email OTP and passkeys to your IdentityServer. Stay tuned!
Question icon
Have a question?
Talk to an expert
NewsletterDemo PasskeysView docs
Duende IdentityServer
Passkeys
Passkeys implementation
Passwordless authentication
Guides

You might also like

The passkey UX patterns that drive adoption in 2026
Passkeys
Passkeys implementation

The passkey UX patterns that drive adoption in 2026

July 2, 2026
What is silent network authentication, and how does it work?
Silent Network Authentication
SNA

What is silent network authentication, and how does it work?

June 26, 2026
HIPAA MFA requirements and what to do before the final rule lands
Passkeys
Step up authentication
Adaptive MFA
SMS Alternative

HIPAA MFA requirements and what to do before the final rule lands

July 4, 2026

Secure your customers’ accounts today with Authsignal

Passkey demoCreate free account
Authsignal Purple Logo

Authsignal is a drop-in authentication and orchestration layer for consumer-facing businesses. Passkeys, adaptive MFA, and omnichannel verification on top of your existing identity stack. Deployed in weeks, not quarters.

AICPA SOCFido Certified
LinkedInTwitter
Platform
Drop-In Authentication
PasskeysBiometric authenticationWhatsApp OTPEmail OTPApp push authenticationPalm biometricsSMS OTPEmail OTPMagic LinksAuthenticator apps (TOTP)
View all auth methods
KEY FEATURES
No-code rules engineUser observabilityRisk-based authenticationSession managementDigital credentials APIPre-built UI
All authentication methods
Pricing
Customers
Solutions
USE CASE
Account takeovers (ATO)
Go passwordless
Call center
SMS cost optimization
Existing apps
Palm biometric payments
View all use cases
industry
Financial services
Healthcare
Marketplace
View all use cases
ROLE
Engineering
ProductCybersecurityDocs
Compare
Twilio Verify vs AuthsignalAuth0 vs AuthsignalAWS Cognito vs Authsignal + AWS Cognito
Resources
LEARN
BlogGuidesRegulatoryTemplatesDocs
COMPANY
About usWhy AuthsignalPartnersCareersSecurityContact
Integrations
Amazon Cognito
Azure AD B2C
Duende IdentityServer
Keycloak
Auth0
NextAuth.js
Custom identity provider
All integrations
United States
+1 214 974-4877
Ireland
+353 12 676529
Australia
+61 387 715 810
New Zealand
+64 275 491 983
© 2026 Authsignal - All Rights Reserved
Terms of servicePrivacy policySecuritySystem statusCookies